> ## Documentation Index
> Fetch the complete documentation index at: https://docs.bettertoken.ai/llms.txt
> Use this file to discover all available pages before exploring further.
# Claude Desktop third-party models: Custom API 및 Codex 설정
> BetterToken custom API Key, CC Switch model mapping, Gateway setup 및 401 fixes로 Claude Desktop에서 third-party GPT 및 Codex models를 사용하세요.
Claude Desktop은 CC Switch Gateway를 통해 third-party GPT 및 Codex models를 사용할 수 있습니다. CC Switch `v3.16.5` 이상에서 BetterToken API Key를 추가하고 OpenAI Responses API format을 선택하며 models를 map하고 proxy를 enable한 다음 Claude Desktop을 다시 시작하세요.
최신 versions의 Claude Desktop과 CC Switch를 사용하세요. 이 setup에는 BetterToken API Key가 필요합니다.
## 설정 단계
Claude Desktop을 최신 version으로, CC Switch를 `v3.16.5` 이상으로 업데이트하세요.
* [Claude Desktop 다운로드](https://claude.ai/download)
* [CC Switch 다운로드](https://github.com/farion1231/cc-switch/releases)
CC Switch를 여세요. 상단 toolbar에서 **Claude Desktop** icon을 선택한 다음 오른쪽 위의 \*\*+\*\*를 클릭하여 provider를 추가하세요.
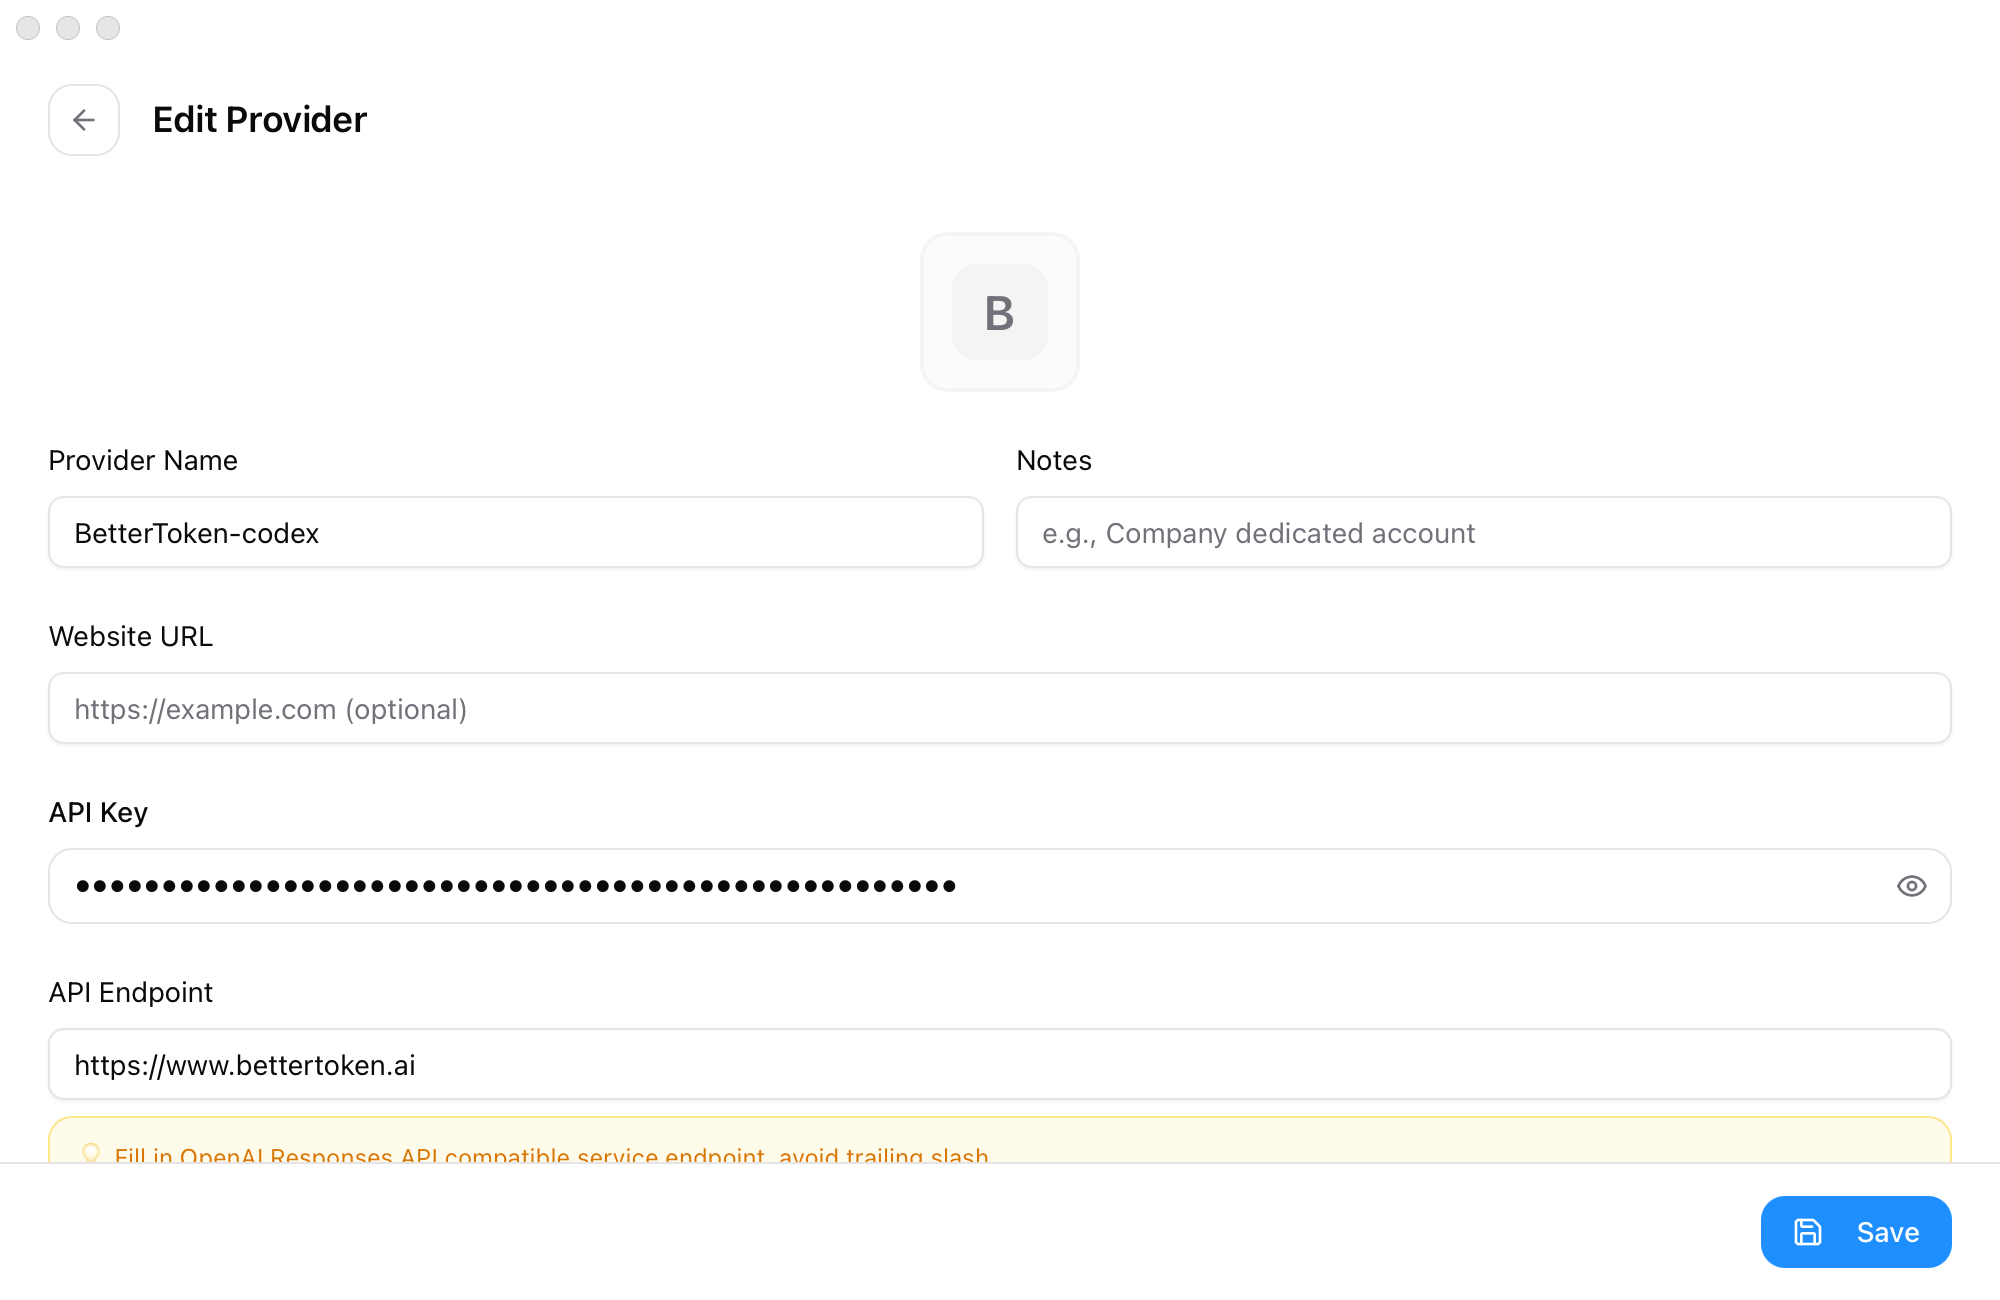
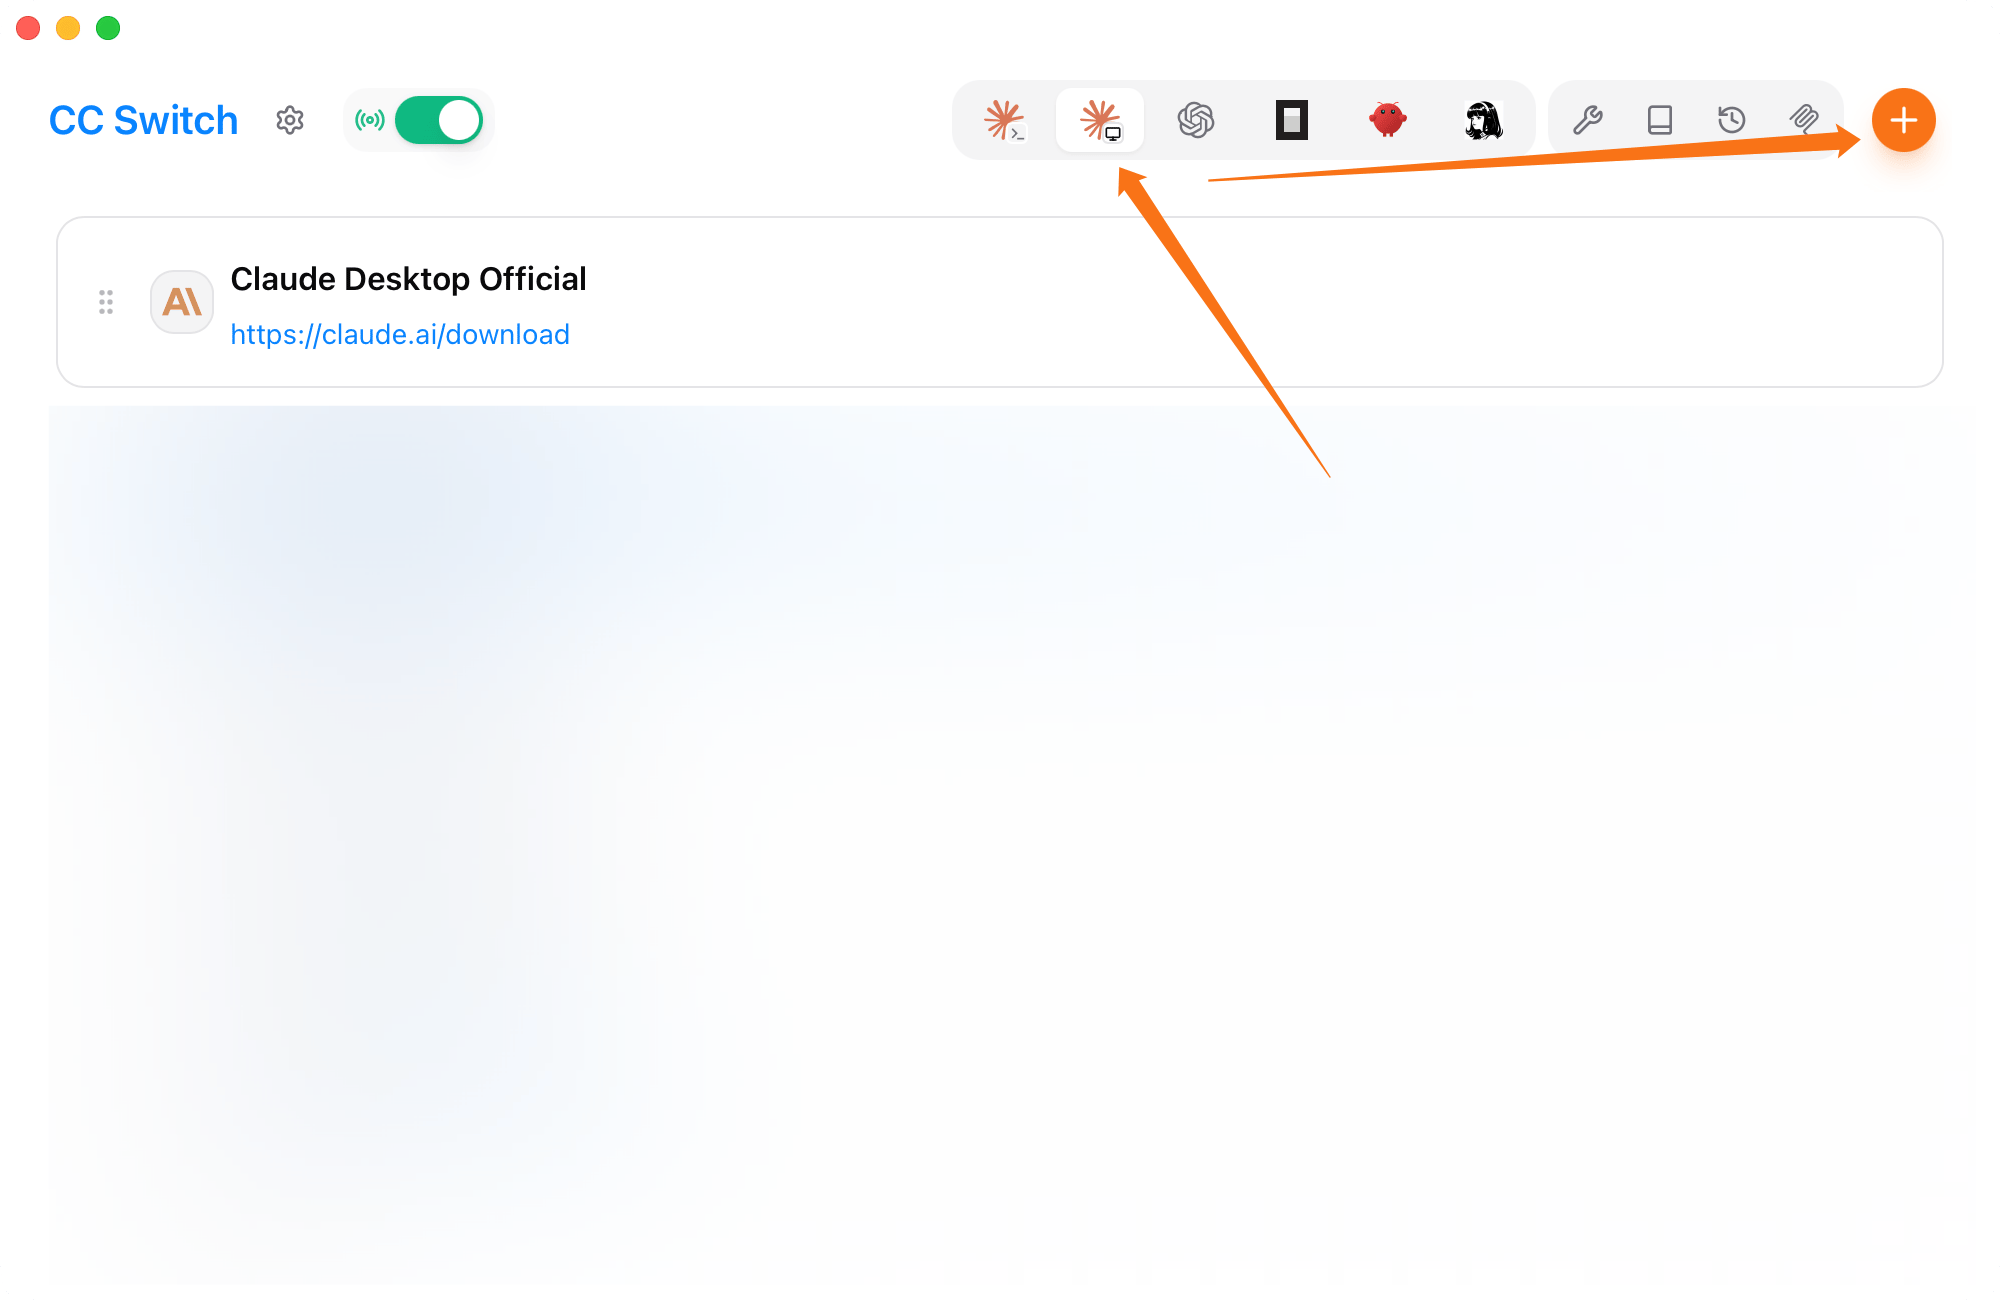 다음 values를 입력하세요.
* **Provider Name**: `BetterToken-codex`
* **API Key**: BetterToken API Key
* **API Endpoint**: `https://www.bettertoken.ai`
다음 values를 입력하세요.
* **Provider Name**: `BetterToken-codex`
* **API Key**: BetterToken API Key
* **API Endpoint**: `https://www.bettertoken.ai`
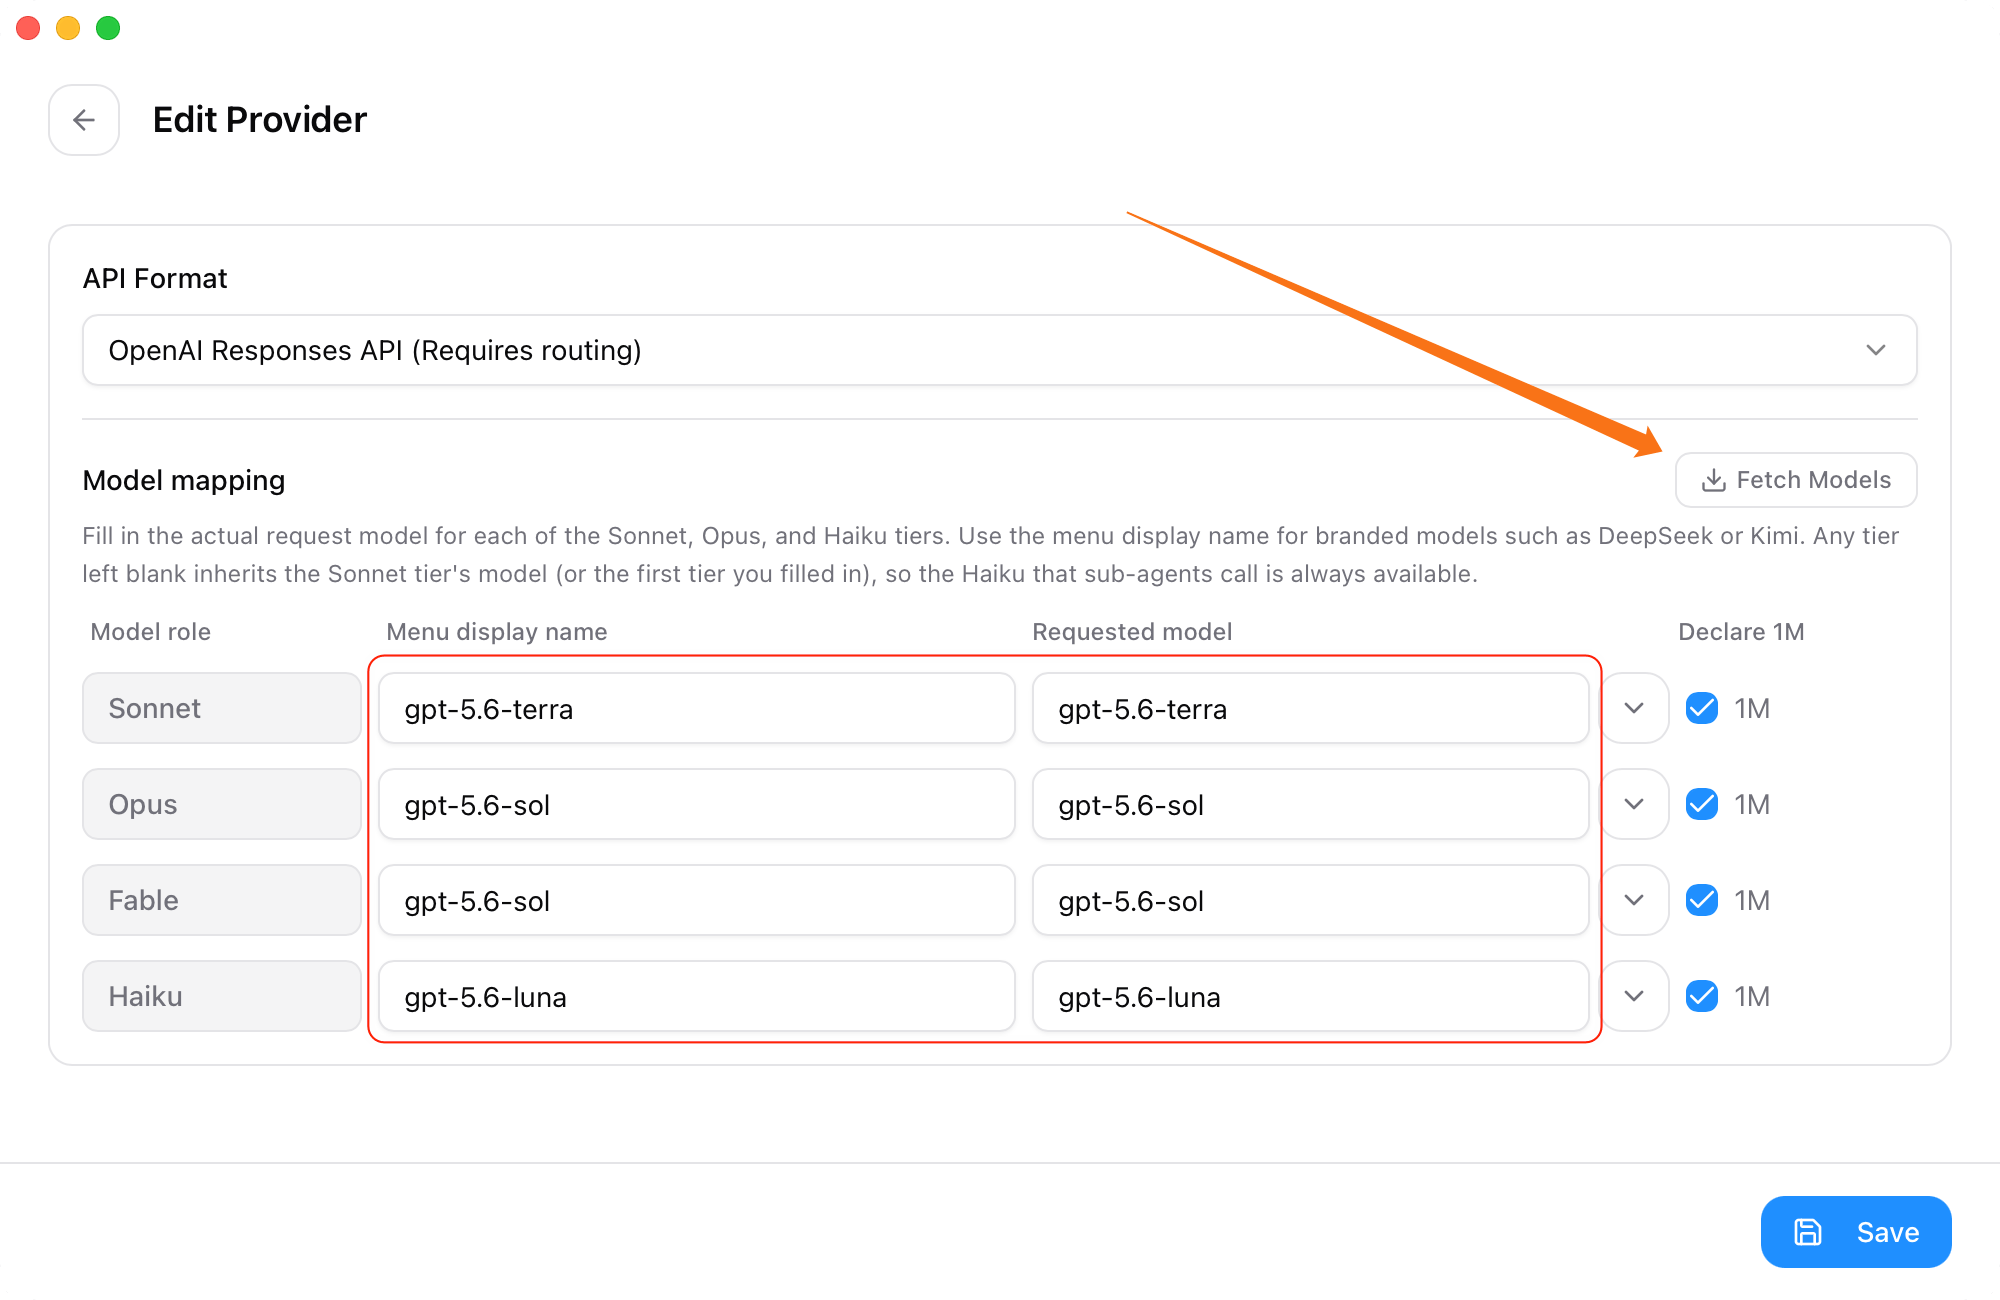
 **API Format**을 \*\*OpenAI Responses API (Requires routing)\*\*로 설정한 다음 **Fetch Models**를 클릭하세요.
아래 mappings를 사용하고 **Declare 1M**을 enabled로 유지하세요.
| Model role | Requested model |
| ---------- | --------------- |
| Sonnet | `gpt-5.6-terra` |
| Opus | `gpt-5.6-sol` |
| Fable | `gpt-5.6-sol` |
| Haiku | `gpt-5.6-luna` |
**API Format**을 \*\*OpenAI Responses API (Requires routing)\*\*로 설정한 다음 **Fetch Models**를 클릭하세요.
아래 mappings를 사용하고 **Declare 1M**을 enabled로 유지하세요.
| Model role | Requested model |
| ---------- | --------------- |
| Sonnet | `gpt-5.6-terra` |
| Opus | `gpt-5.6-sol` |
| Fable | `gpt-5.6-sol` |
| Haiku | `gpt-5.6-luna` |
 모델 광장의 GPT provider에서 현재 available model IDs를 사용하세요.
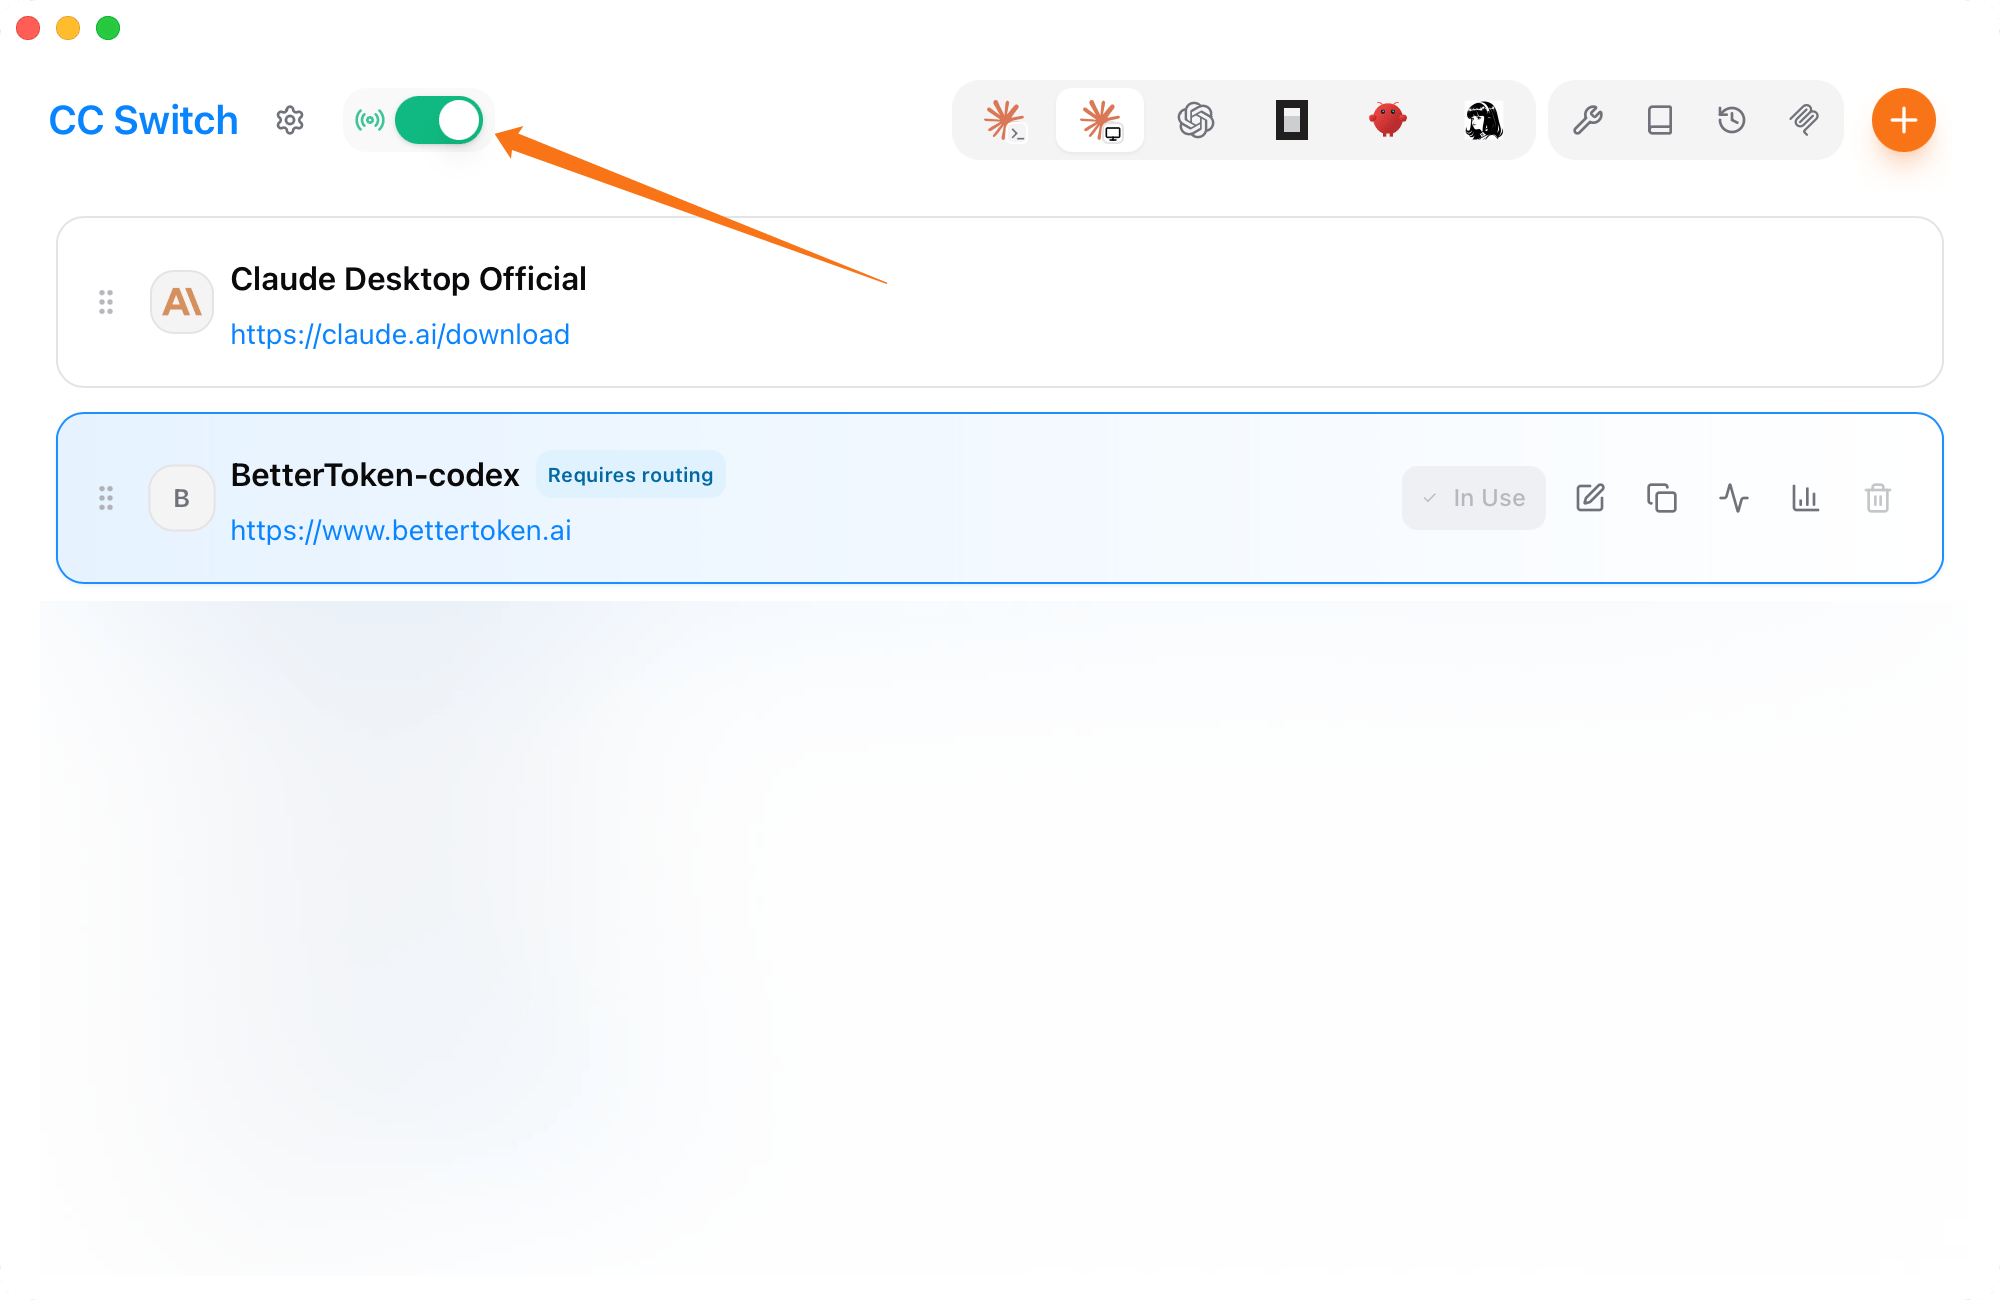
provider를 저장한 후 Claude Desktop provider list로 돌아가세요.
1. 새 **BetterToken-codex** provider를 **In use**가 표시될 때까지 선택하세요.
2. 왼쪽 위의 proxy switch를 켜세요.
모델 광장의 GPT provider에서 현재 available model IDs를 사용하세요.
provider를 저장한 후 Claude Desktop provider list로 돌아가세요.
1. 새 **BetterToken-codex** provider를 **In use**가 표시될 때까지 선택하세요.
2. 왼쪽 위의 proxy switch를 켜세요.
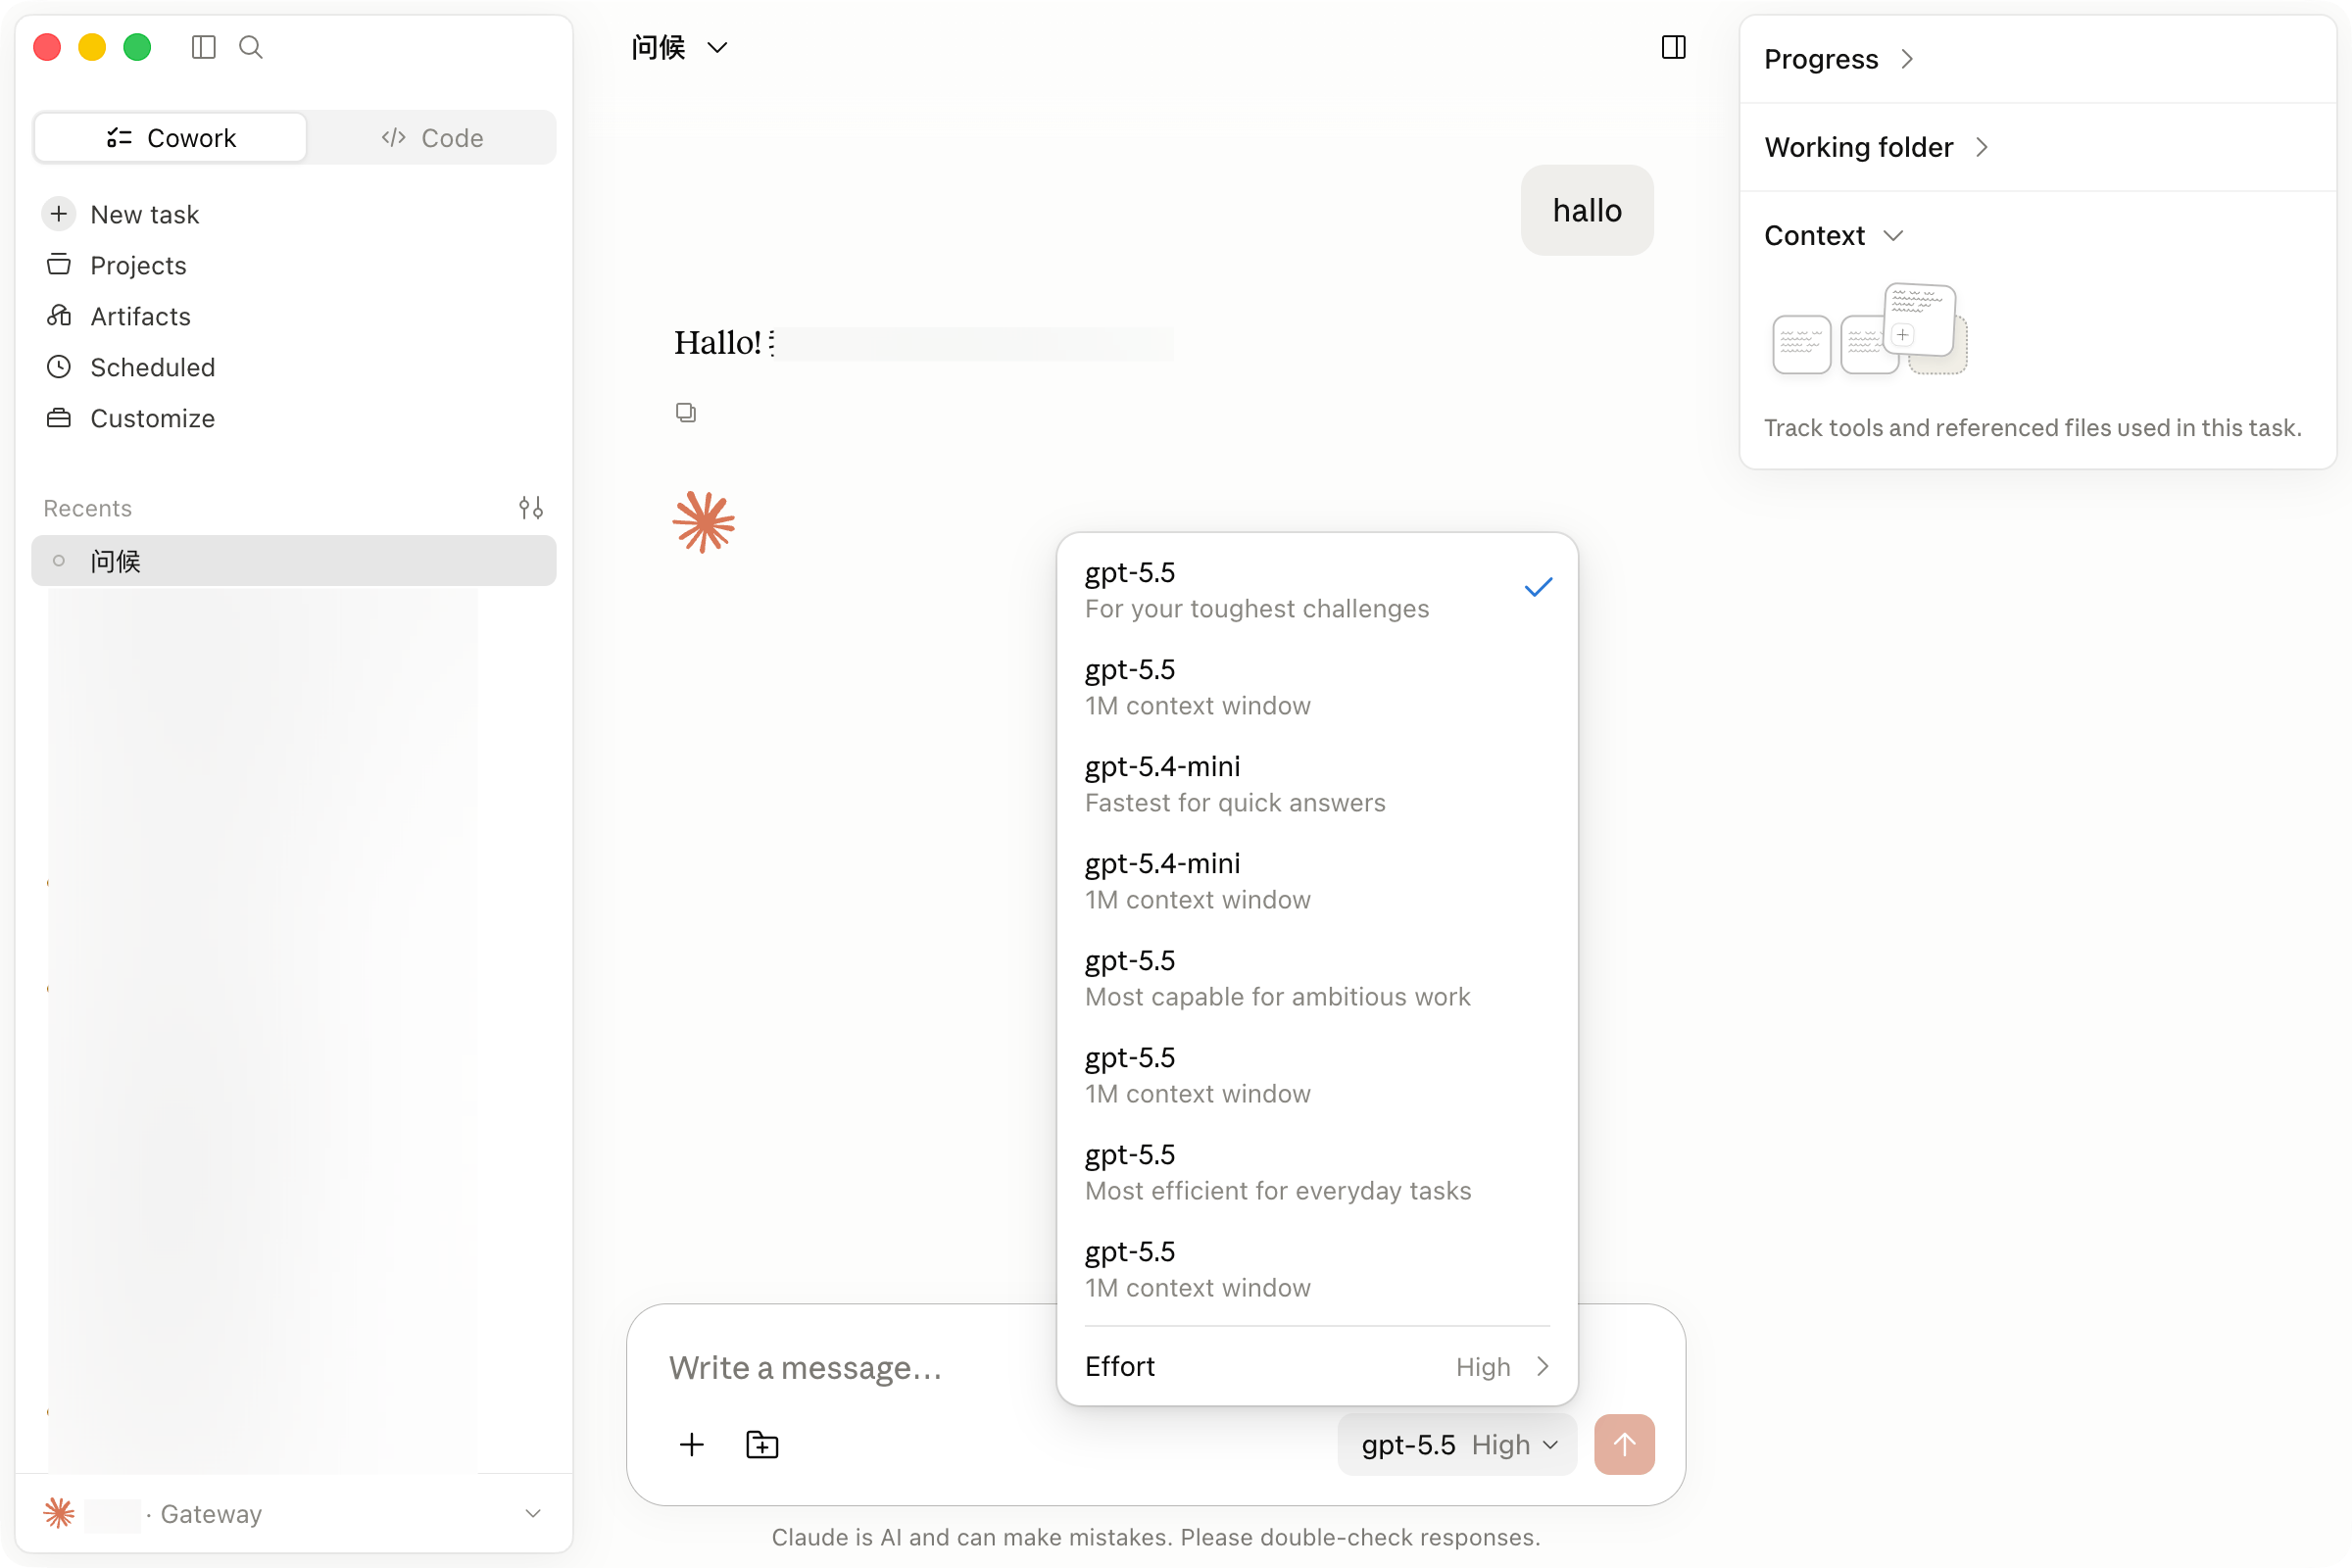
 Claude Desktop을 완전히 종료한 다음 다시 여세요. 왼쪽 아래의 **Gateway**가 configuration이 active임을 확인합니다.
message box의 model menu에서 필요한 model을 선택한 다음 작업을 시작하세요.
Claude Desktop을 완전히 종료한 다음 다시 여세요. 왼쪽 아래의 **Gateway**가 configuration이 active임을 확인합니다.
message box의 model menu에서 필요한 model을 선택한 다음 작업을 시작하세요.
 ## 문제 해결
### Claude Desktop에 Gateway가 표시되지 않음
CC Switch에서 **BetterToken-codex**가 **In use**로 설정되고 proxy switch가 켜져 있는지 확인하세요. Claude Desktop을 완전히 종료하고 다시 여세요.
### model list가 비어 있음
provider editor를 열고 **Fetch Models**를 클릭하여 model mappings가 저장되었는지 확인하세요. 모델 광장의 GPT provider에서 model ID를 사용한 다음 Claude Desktop을 다시 시작하세요.
### `401` or `Unauthorized`
BetterToken API Key를 입력했는지 확인하세요. key를 교체한 후 provider를 저장하고 proxy를 다시 enable한 다음 Claude Desktop을 다시 시작하세요.
### Requests가 BetterToken을 통해 전송되지 않음
Claude Desktop Official이 아니라 **BetterToken-codex**가 active인지, 왼쪽 위의 proxy switch가 enabled 상태인지 확인하세요.
## 관련 가이드
* [CC Switch에서 BetterToken 구성](/ko/ai-tools/cc-switch)
* [Codex CLI에서 custom provider 구성](/ko/ai-tools/codex)
* [Cline에서 OpenAI-compatible API 구성](/ko/ai-tools/cline)
* [OpenAI-compatible API와 Anthropic-compatible API 비교](/ko/faq/concepts/openai-compatible-vs-anthropic-compatible)
## 문제 해결
### Claude Desktop에 Gateway가 표시되지 않음
CC Switch에서 **BetterToken-codex**가 **In use**로 설정되고 proxy switch가 켜져 있는지 확인하세요. Claude Desktop을 완전히 종료하고 다시 여세요.
### model list가 비어 있음
provider editor를 열고 **Fetch Models**를 클릭하여 model mappings가 저장되었는지 확인하세요. 모델 광장의 GPT provider에서 model ID를 사용한 다음 Claude Desktop을 다시 시작하세요.
### `401` or `Unauthorized`
BetterToken API Key를 입력했는지 확인하세요. key를 교체한 후 provider를 저장하고 proxy를 다시 enable한 다음 Claude Desktop을 다시 시작하세요.
### Requests가 BetterToken을 통해 전송되지 않음
Claude Desktop Official이 아니라 **BetterToken-codex**가 active인지, 왼쪽 위의 proxy switch가 enabled 상태인지 확인하세요.
## 관련 가이드
* [CC Switch에서 BetterToken 구성](/ko/ai-tools/cc-switch)
* [Codex CLI에서 custom provider 구성](/ko/ai-tools/codex)
* [Cline에서 OpenAI-compatible API 구성](/ko/ai-tools/cline)
* [OpenAI-compatible API와 Anthropic-compatible API 비교](/ko/faq/concepts/openai-compatible-vs-anthropic-compatible)