> ## Documentation Index
> Fetch the complete documentation index at: https://docs.bettertoken.ai/llms.txt
> Use this file to discover all available pages before exploring further.
# Kodacode 설정: 설치, API Key, Base URL 및 사용자 지정 모델
> Kodacode를 설치하고 BetterToken Base URL 및 API Key를 설정한 다음 호환되는 provider model을 선택하고 일반적인 오류를 해결하세요.
Kodacode를 BetterToken에 연결하려면 API Key를 준비하고 아래 Base URL을 입력한 후 모델 광장에서 현재 Model ID를 선택하세요.
## 주요 설정
| 필드 | 값 |
| -------- | ----------------------------------------------------------------- |
| API Key | BetterToken API Key |
| Base URL | `https://www.bettertoken.ai/v1` |
| 모델 | 모델 광장의 현재 Model ID |
## 사전 요구 사항
* 최신 버전의 도구가 설치되어 있음
* BetterToken API Key: 등록하고 발급받기
* 모델 광장의 Model ID
### 추가 요구 사항
* VS Code가 설치되어 있음
* Kodacode / Koda extension이 설치되어 있음
* 선택한 Model ID가 **지원되는 provider**에서 옴
## 설치
Kodacode를 설치하거나 연 다음 아래의 수동 설정을 계속하세요.
## 수동 설정
| 필드 | 값 |
| -------- | ----------------------------------------------------------------- |
| API Key | BetterToken API Key |
| Base URL | `https://www.bettertoken.ai/v1` |
| 모델 | 모델 광장의 현재 Model ID |
### 설정
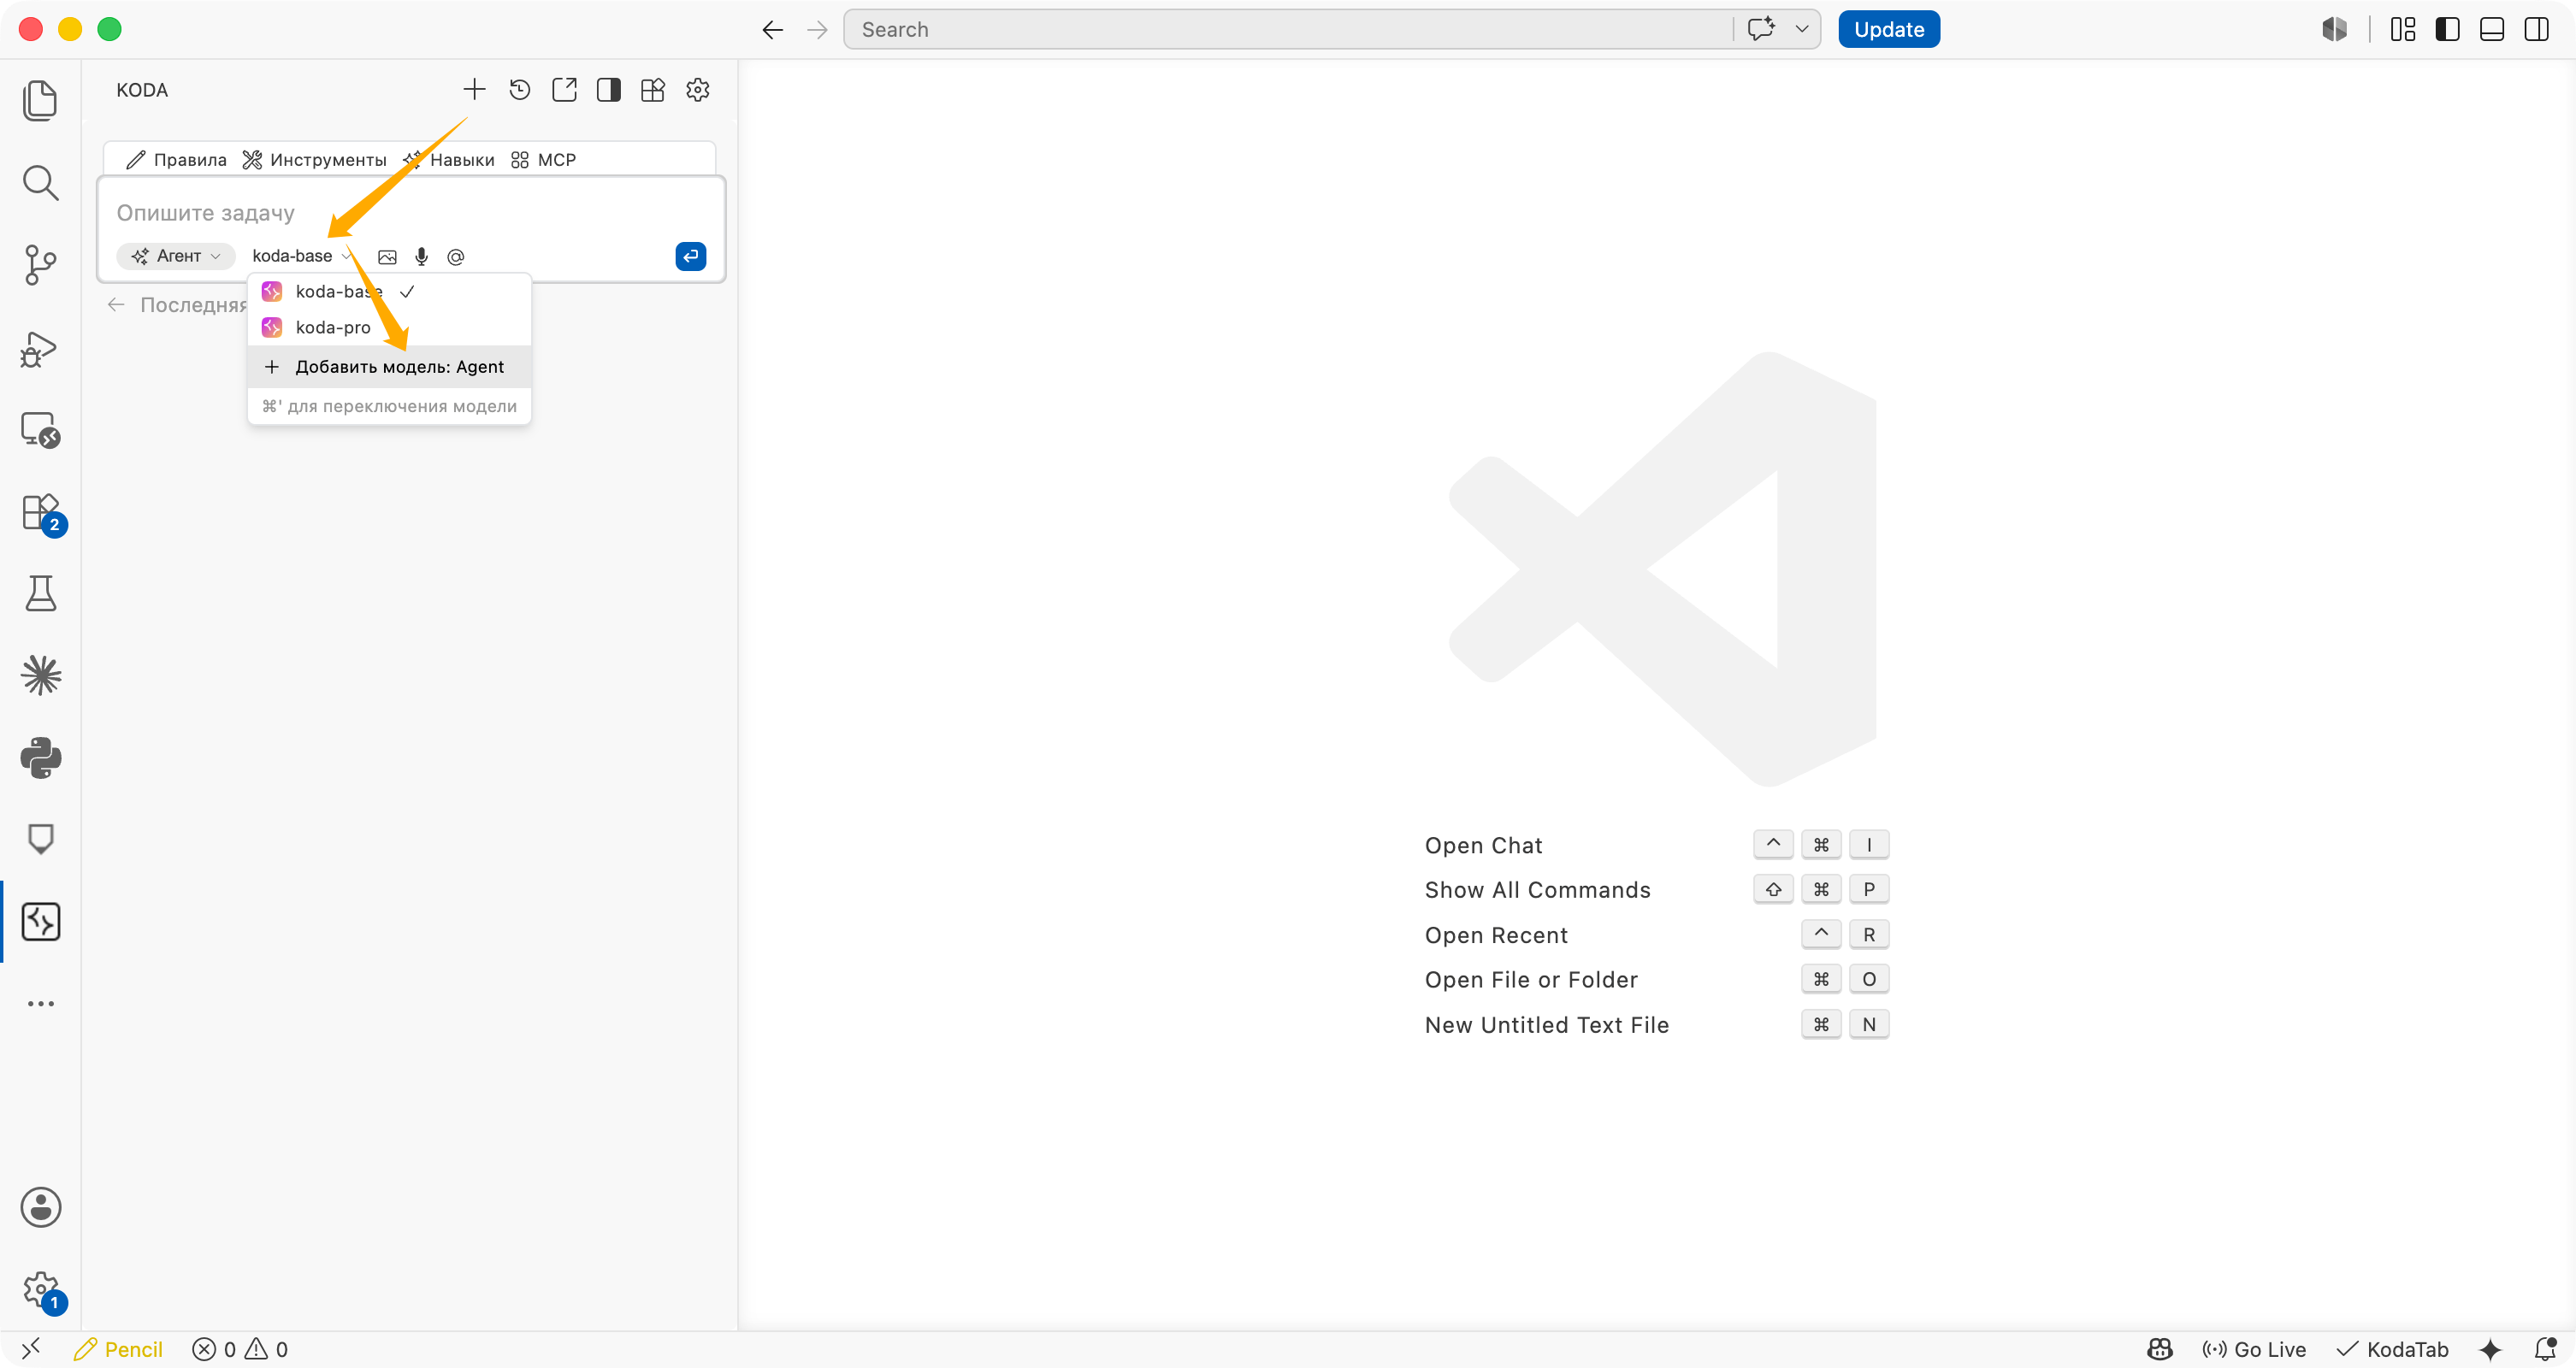
VS Code sidebar에서 **KODA** panel을 열고 input box 아래의 model selector를 클릭한 다음 **모델 추가: Agent** / **Add model: Agent**를 선택하세요.
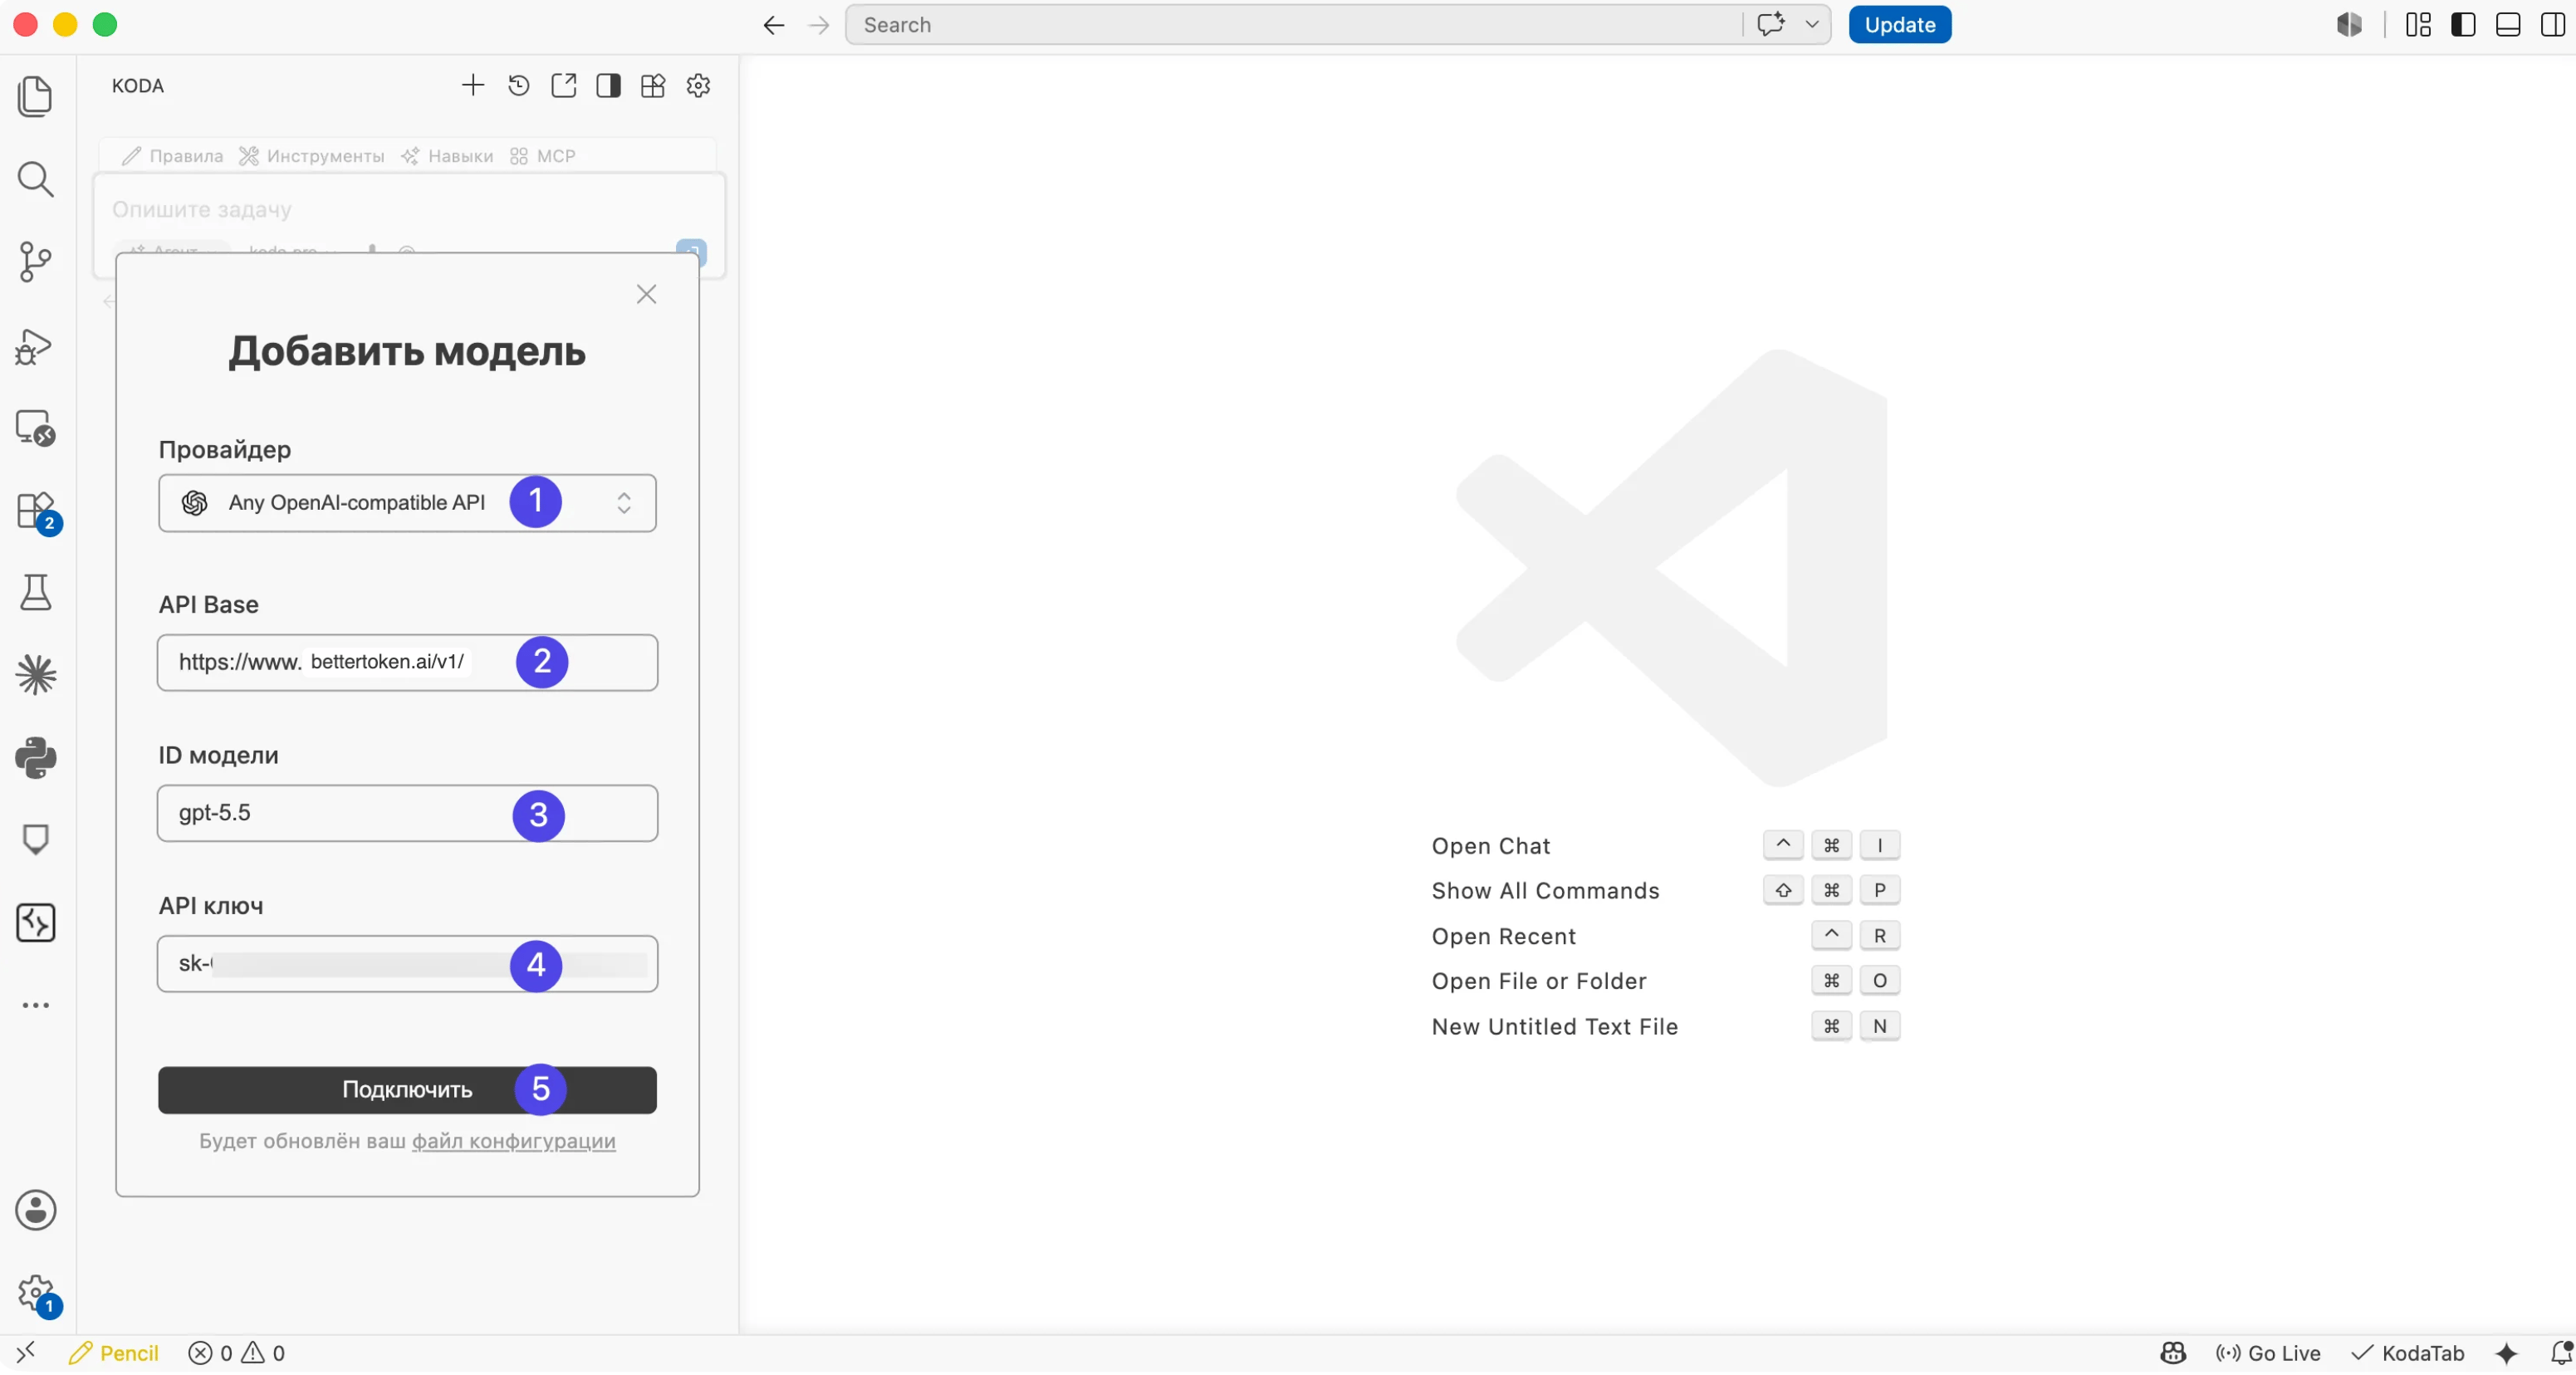
 add model dialog에서 다음 값을 사용하세요.
| 필드 | 권장 값 |
| -------- | ------------------------------------------------------------------------------------------------ |
| Provider | `Any OpenAI-compatible API` |
| API Base | `https://www.bettertoken.ai/v1/` |
| Model ID | 모델 광장의 지원되는 provider model ID(예: `YOUR_MODEL_ID`) |
| API Key | BetterToken API Key |
fields를 입력한 후 **연결** / **Connect**를 클릭하세요.
add model dialog에서 다음 값을 사용하세요.
| 필드 | 권장 값 |
| -------- | ------------------------------------------------------------------------------------------------ |
| Provider | `Any OpenAI-compatible API` |
| API Base | `https://www.bettertoken.ai/v1/` |
| Model ID | 모델 광장의 지원되는 provider model ID(예: `YOUR_MODEL_ID`) |
| API Key | BetterToken API Key |
fields를 입력한 후 **연결** / **Connect**를 클릭하세요.
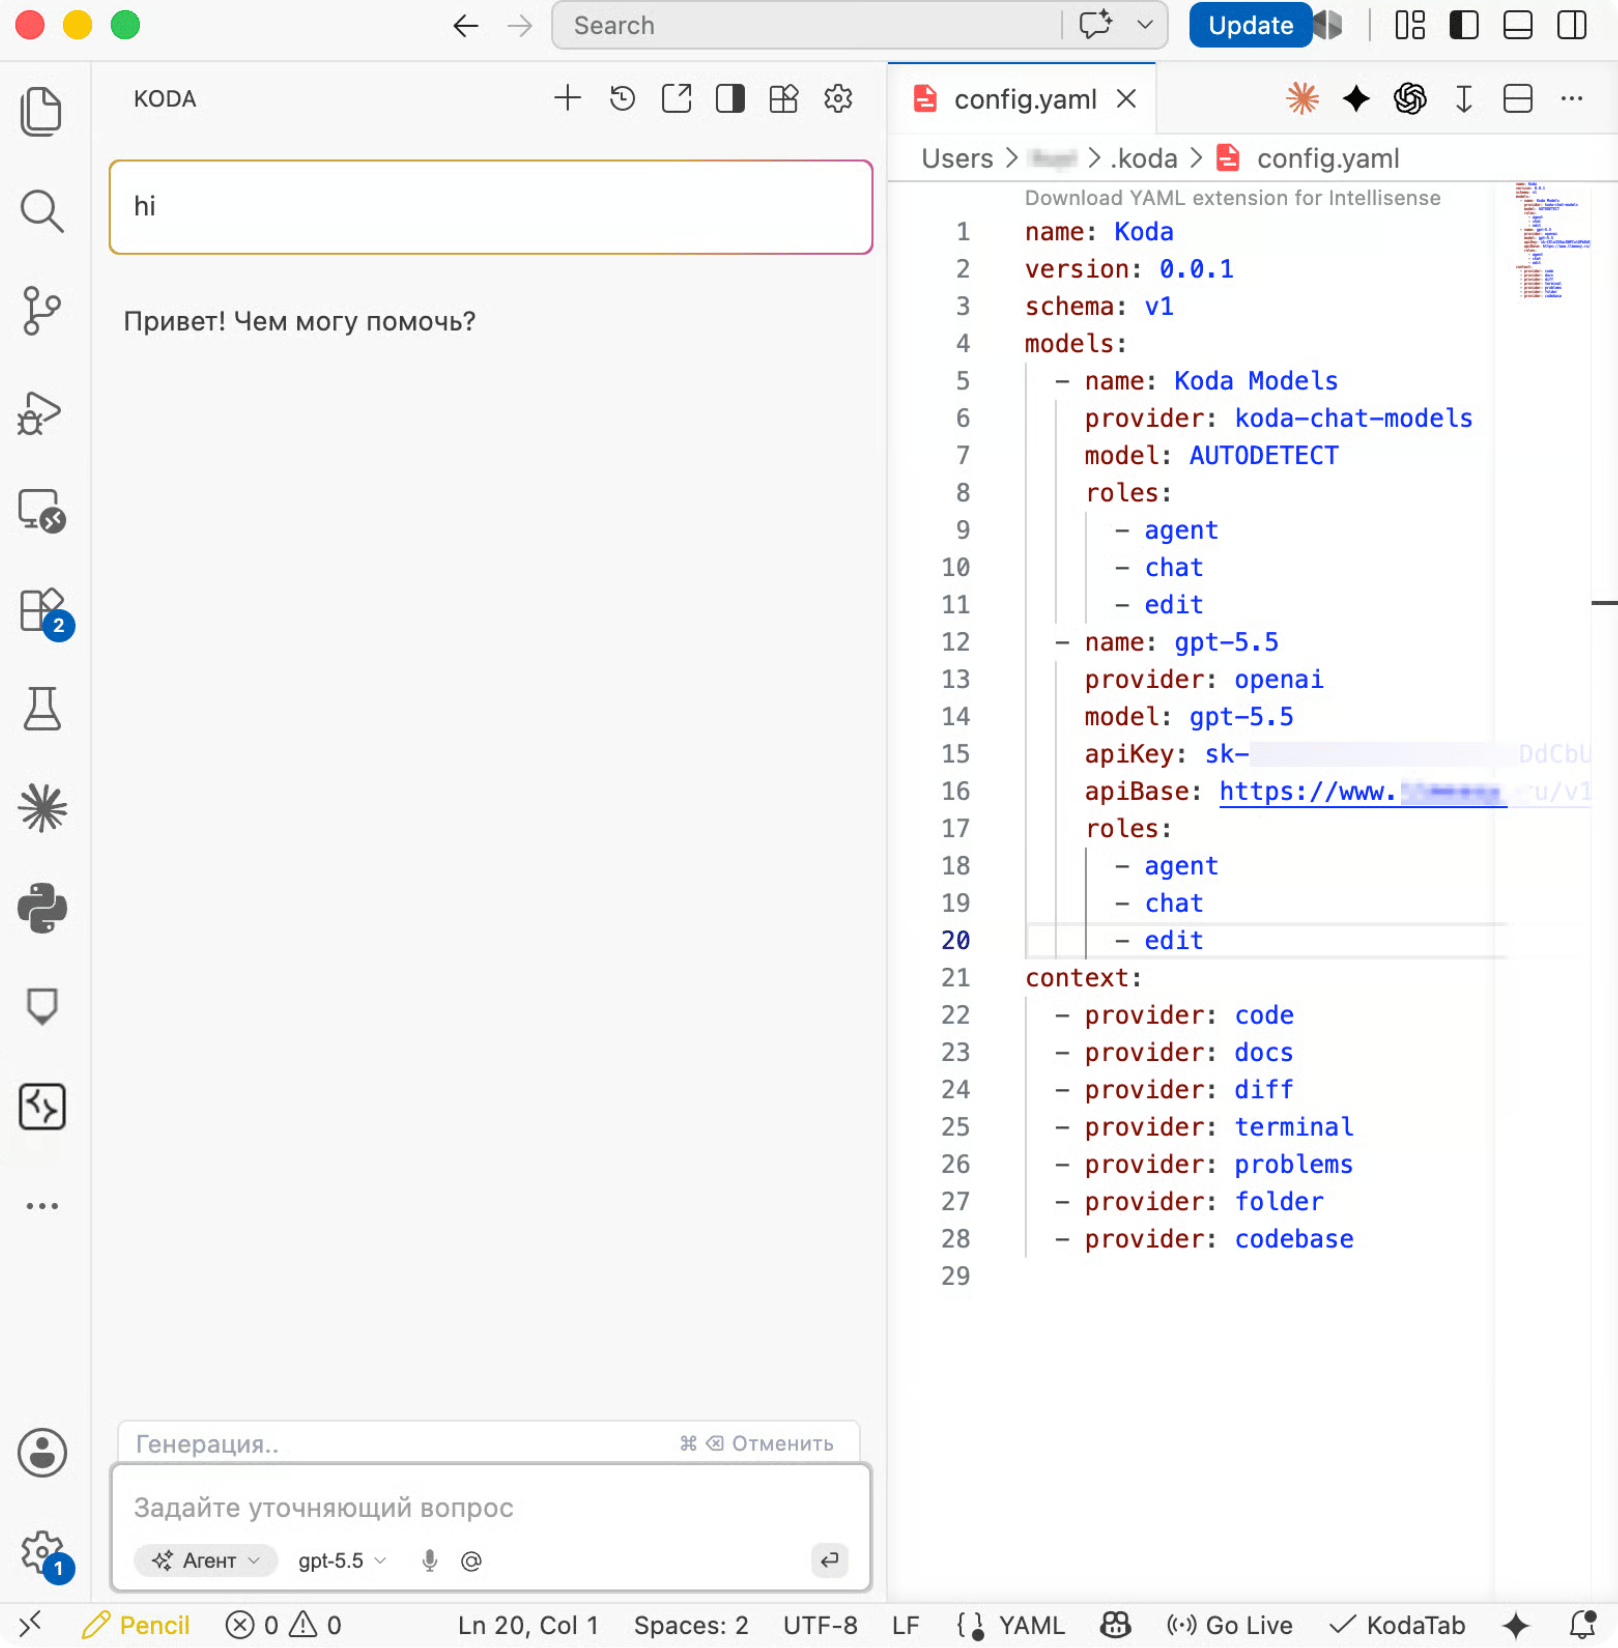
 연결에 성공하면 Koda input box 아래의 model selector에서 `YOUR_MODEL_ID`와 같은 새 모델을 선택하세요. 짧은 message를 보내 response가 반환되는지 확인하세요.
Kodacode는 configuration을 `~/.koda/config.yaml`에 작성합니다. 이 file을 열어 모델이 추가되었는지 확인하세요.
연결에 성공하면 Koda input box 아래의 model selector에서 `YOUR_MODEL_ID`와 같은 새 모델을 선택하세요. 짧은 message를 보내 response가 반환되는지 확인하세요.
Kodacode는 configuration을 `~/.koda/config.yaml`에 작성합니다. 이 file을 열어 모델이 추가되었는지 확인하세요.
 ### config.yaml 예시
이 전체 structure를 참고하세요. `YOUR_API_KEY`를 BetterToken API Key로 바꾸고 실제 API Key를 repository에 commit하지 마세요.
```yaml theme={null}
name: Koda
version: 0.0.1
schema: v1
models:
- name: Koda Models
provider: koda-chat-models
model: AUTODETECT
roles:
- agent
- chat
- edit
- name: YOUR_MODEL_ID
provider: openai
model: YOUR_MODEL_ID
apiKey: YOUR_API_KEY
apiBase: https://www.bettertoken.ai/v1/
roles:
- agent
- chat
- edit
context:
- provider: code
- provider: docs
- provider: diff
- provider: terminal
- provider: problems
- provider: folder
- provider: codebase
```
`YOUR_MODEL_ID` 이외의 모델을 사용한다면 `name`과 `model`을 모두 모델 광장의 지원되는 provider model ID와 일치하도록 업데이트하세요.
## 연결 확인
짧은 테스트 prompt를 보내세요. 도구가 authentication 또는 Model ID 오류 없이 response를 반환하면 연결이 작동합니다. configuration을 변경한 후에는 도구를 완전히 다시 시작하세요.
## 모델 전환
model selector를 열거나 configuration의 `Model` field를 변경하세요. 모델 광장의 정확한 Model ID를 사용한 다음 현재 session을 다시 시작하세요.
## 일반적인 오류
| 오류 | 확인할 사항 |
| ----------------------- | ------------------------------------------------ |
| `401` 또는 `Unauthorized` | BetterToken API Key를 확인하고 앞뒤 spaces를 제거하세요. |
| `404` | Base URL을 확인하고 specific endpoint path를 추가하지 마세요. |
| `model not found` | 모델 광장에서 현재 Model ID를 복사하세요. |
| Changes가 적용되지 않음 | configuration을 저장하고 도구를 완전히 다시 시작하세요. |
* 연결에 실패하면 **API Base**가 `https://www.bettertoken.ai/v1/`인지 확인하고 끝의 `/`를 유지하세요.
* 모델을 사용할 수 없다면 **Model ID**가 지원되는 provider에서 왔는지 확인하세요.
* authentication에 실패하면 API Key를 다시 복사하고 extra spaces 또는 line breaks를 피하세요.
* `config.yaml` 변경 사항이 적용되지 않으면 VS Code를 다시 시작하거나 **Developer: Reload Window**를 실행하세요.
* BetterToken에는 보통 extra `User-Agent` 또는 custom headers가 필요하지 않습니다.
## 고급 설정
### 지원 Provider
| Provider | 상태 |
| -------- | ------- |
| Claude | 지원되지 않음 |
| GPT | 수동 설정 |
| Kimi | 수동 설정 |
| GLM | 수동 설정 |
표시된 상태는 이 페이지에서 설명하는 BetterToken 설정 방식에 적용됩니다.
* **수동 설정**: API Key, Base URL, Model을 입력하세요.
* **지원되지 않음**: 검증된 직접 연결 방식이 아직 없습니다.
### 관련 가이드
* [Kodacode plugin 개요](https://docs.kodacode.ru/plugin/overview.html)
* [Kodacode plugin 설치 가이드](https://docs.kodacode.ru/plugin/install.html)
## 기술 세부 정보
이 설정은 `https://www.bettertoken.ai/v1`을 사용합니다. 도구가 OpenAI-compatible endpoint path를 추가합니다. 특정 field에서 명시적으로 요구하지 않는 한 `/chat/completions` 또는 `/responses`를 추가하지 마세요.
### config.yaml 예시
이 전체 structure를 참고하세요. `YOUR_API_KEY`를 BetterToken API Key로 바꾸고 실제 API Key를 repository에 commit하지 마세요.
```yaml theme={null}
name: Koda
version: 0.0.1
schema: v1
models:
- name: Koda Models
provider: koda-chat-models
model: AUTODETECT
roles:
- agent
- chat
- edit
- name: YOUR_MODEL_ID
provider: openai
model: YOUR_MODEL_ID
apiKey: YOUR_API_KEY
apiBase: https://www.bettertoken.ai/v1/
roles:
- agent
- chat
- edit
context:
- provider: code
- provider: docs
- provider: diff
- provider: terminal
- provider: problems
- provider: folder
- provider: codebase
```
`YOUR_MODEL_ID` 이외의 모델을 사용한다면 `name`과 `model`을 모두 모델 광장의 지원되는 provider model ID와 일치하도록 업데이트하세요.
## 연결 확인
짧은 테스트 prompt를 보내세요. 도구가 authentication 또는 Model ID 오류 없이 response를 반환하면 연결이 작동합니다. configuration을 변경한 후에는 도구를 완전히 다시 시작하세요.
## 모델 전환
model selector를 열거나 configuration의 `Model` field를 변경하세요. 모델 광장의 정확한 Model ID를 사용한 다음 현재 session을 다시 시작하세요.
## 일반적인 오류
| 오류 | 확인할 사항 |
| ----------------------- | ------------------------------------------------ |
| `401` 또는 `Unauthorized` | BetterToken API Key를 확인하고 앞뒤 spaces를 제거하세요. |
| `404` | Base URL을 확인하고 specific endpoint path를 추가하지 마세요. |
| `model not found` | 모델 광장에서 현재 Model ID를 복사하세요. |
| Changes가 적용되지 않음 | configuration을 저장하고 도구를 완전히 다시 시작하세요. |
* 연결에 실패하면 **API Base**가 `https://www.bettertoken.ai/v1/`인지 확인하고 끝의 `/`를 유지하세요.
* 모델을 사용할 수 없다면 **Model ID**가 지원되는 provider에서 왔는지 확인하세요.
* authentication에 실패하면 API Key를 다시 복사하고 extra spaces 또는 line breaks를 피하세요.
* `config.yaml` 변경 사항이 적용되지 않으면 VS Code를 다시 시작하거나 **Developer: Reload Window**를 실행하세요.
* BetterToken에는 보통 extra `User-Agent` 또는 custom headers가 필요하지 않습니다.
## 고급 설정
### 지원 Provider
| Provider | 상태 |
| -------- | ------- |
| Claude | 지원되지 않음 |
| GPT | 수동 설정 |
| Kimi | 수동 설정 |
| GLM | 수동 설정 |
표시된 상태는 이 페이지에서 설명하는 BetterToken 설정 방식에 적용됩니다.
* **수동 설정**: API Key, Base URL, Model을 입력하세요.
* **지원되지 않음**: 검증된 직접 연결 방식이 아직 없습니다.
### 관련 가이드
* [Kodacode plugin 개요](https://docs.kodacode.ru/plugin/overview.html)
* [Kodacode plugin 설치 가이드](https://docs.kodacode.ru/plugin/install.html)
## 기술 세부 정보
이 설정은 `https://www.bettertoken.ai/v1`을 사용합니다. 도구가 OpenAI-compatible endpoint path를 추가합니다. 특정 field에서 명시적으로 요구하지 않는 한 `/chat/completions` 또는 `/responses`를 추가하지 마세요.