> ## Documentation Index
> Fetch the complete documentation index at: https://docs.bettertoken.ai/llms.txt
> Use this file to discover all available pages before exploring further.
# BetterToken で Claude モデルを Claude Desktop に接続する
> Base URL と API Key を使って、Claude Desktop Gateway で BetterToken の Claude プロバイダーを設定します。
このページでは、BetterToken の **Claude プロバイダー**向け Claude Desktop 直接設定のみを説明します。BetterToken API Key、`https://www.bettertoken.ai`、`x-api-key` を入力してから Claude Desktop を再起動してください。
## 主要設定
| 項目 | 値 |
| -------- | ---------------------------- |
| API Key | BetterToken API Key |
| Base URL | `https://www.bettertoken.ai` |
| Model | Claude プロバイダーのモデル |
## 事前準備
* BetterToken API Key を作成してコピー
* API Key で Claude プロバイダーのモデルを利用できることを確認
## インストール
[Claude Desktop のサイト](https://claude.ai/download)から最新バージョンをインストールまたは更新し、Claude Desktop を起動します。
## 手動設定
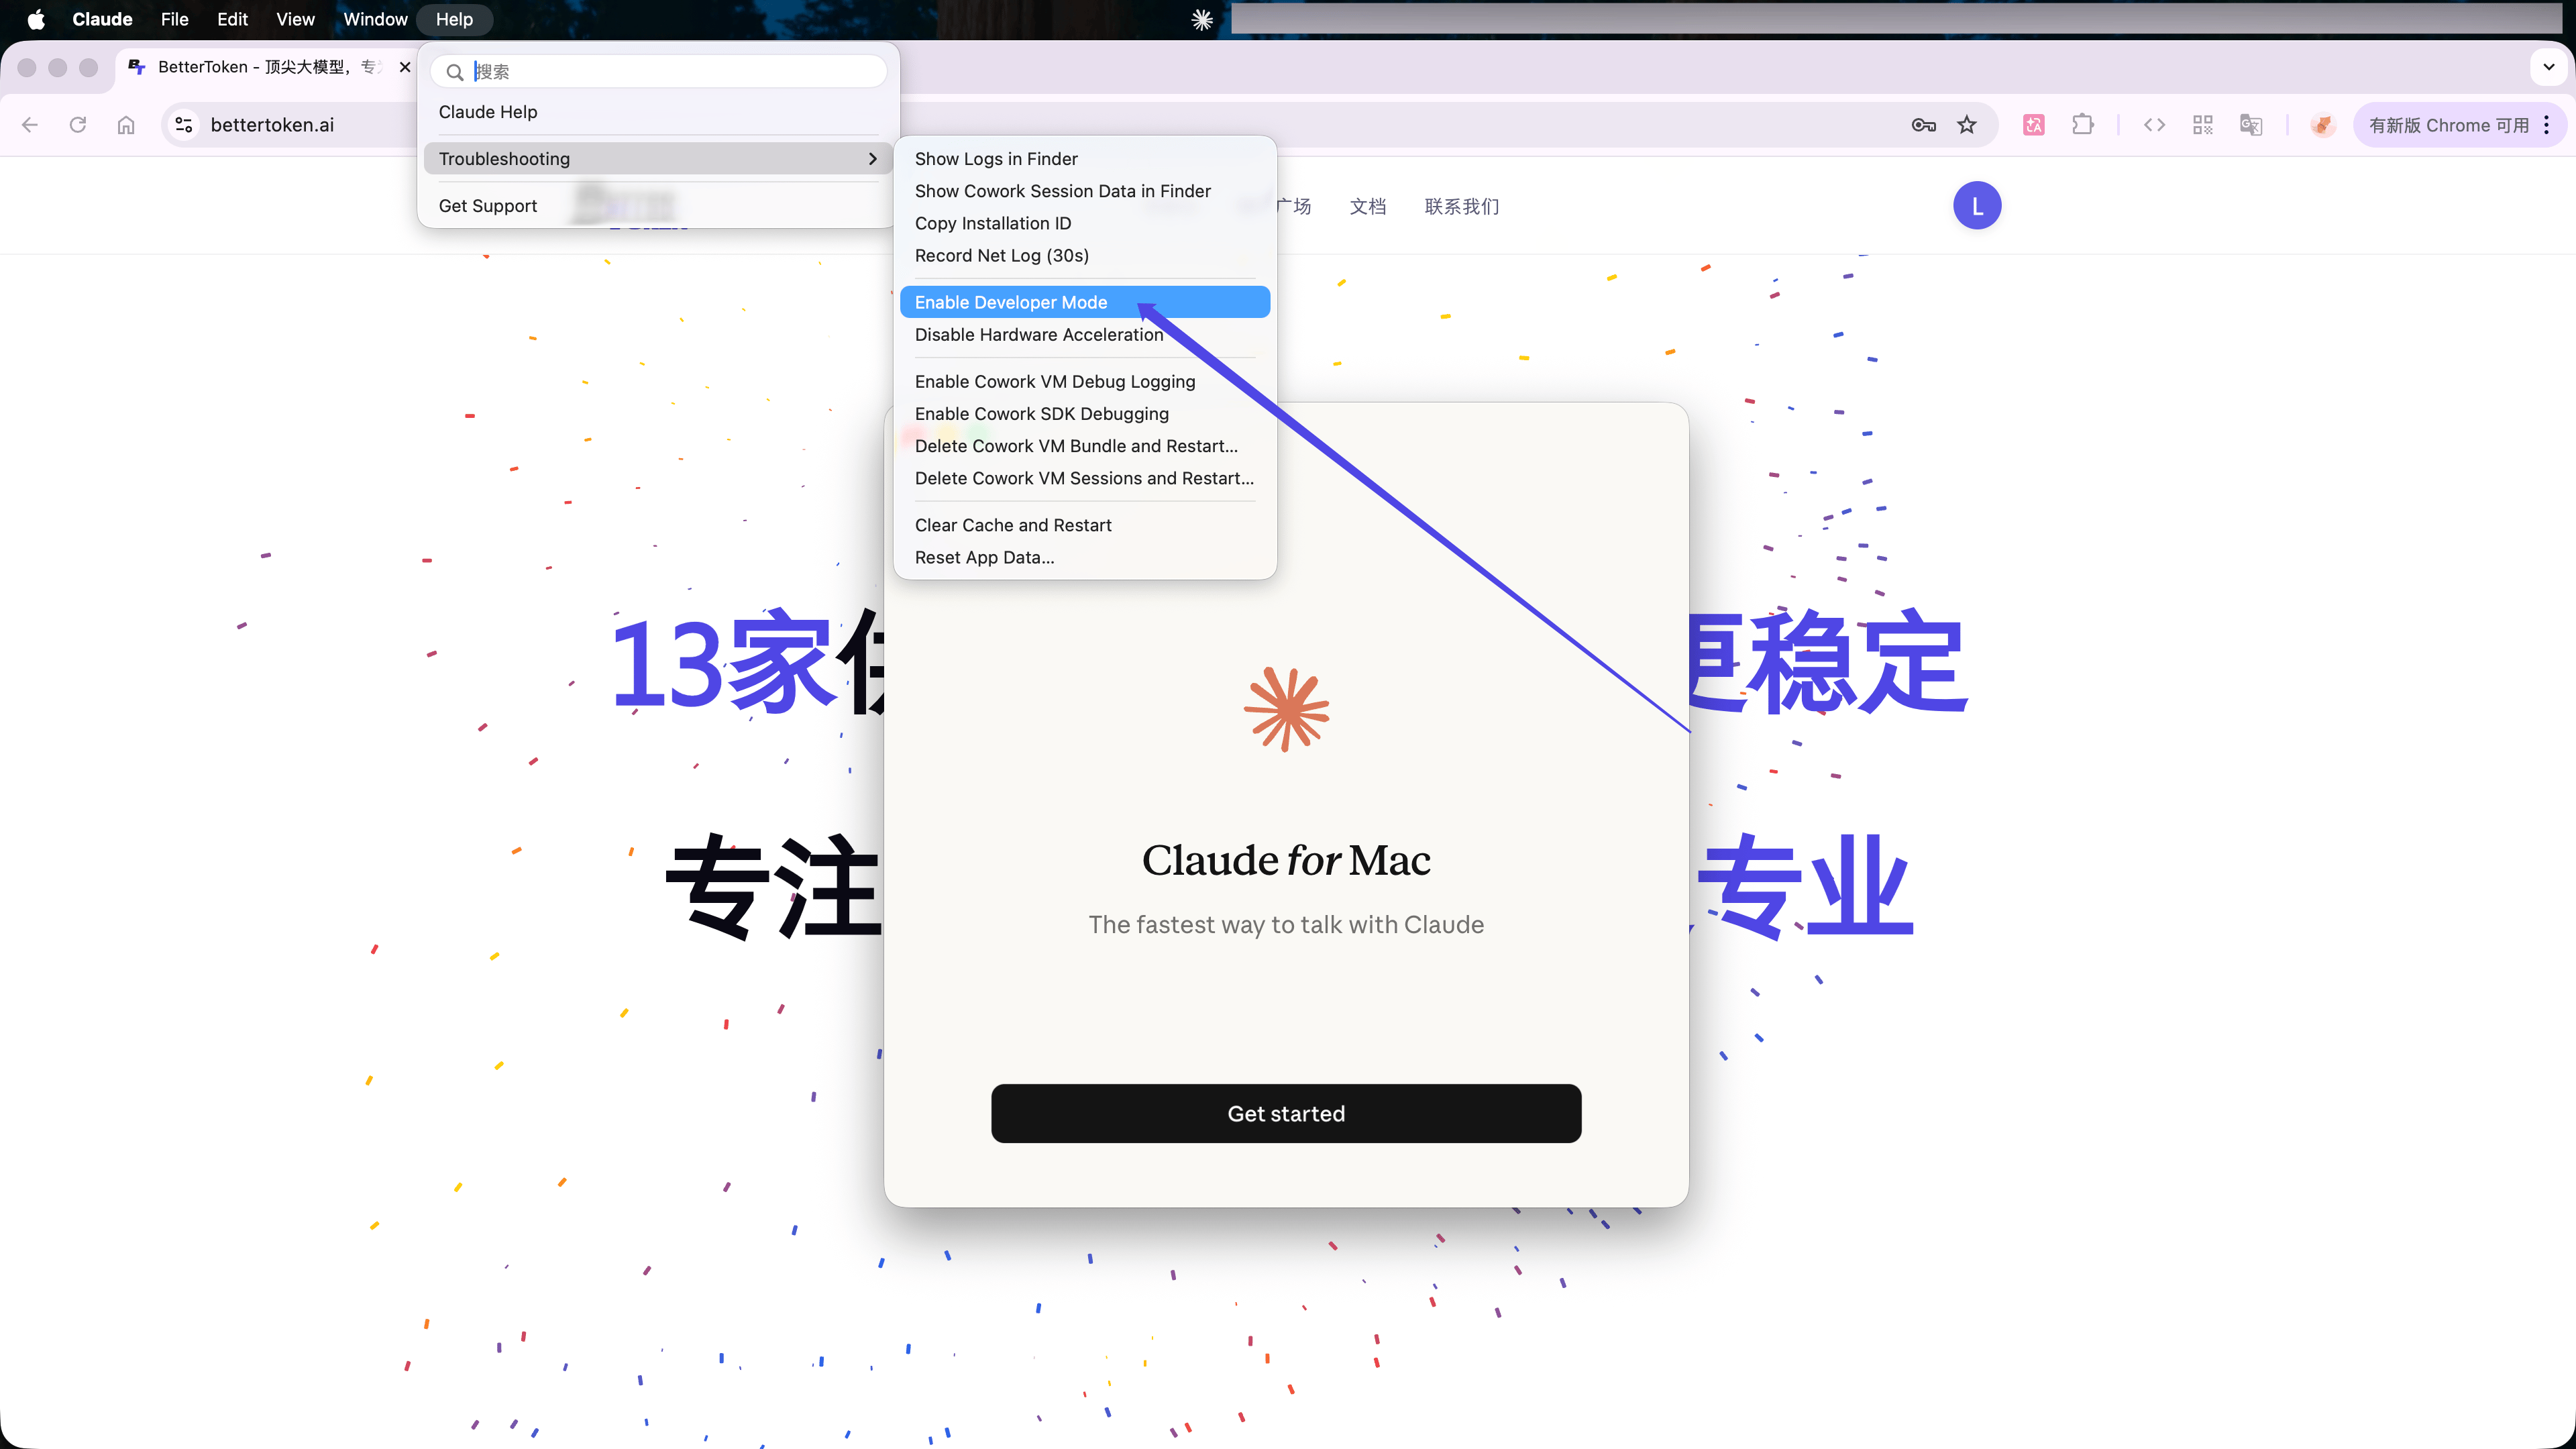
Claude Desktop の macOS メニューバーで **Help** → **Troubleshooting** → **Enable Developer Mode** を選択します。
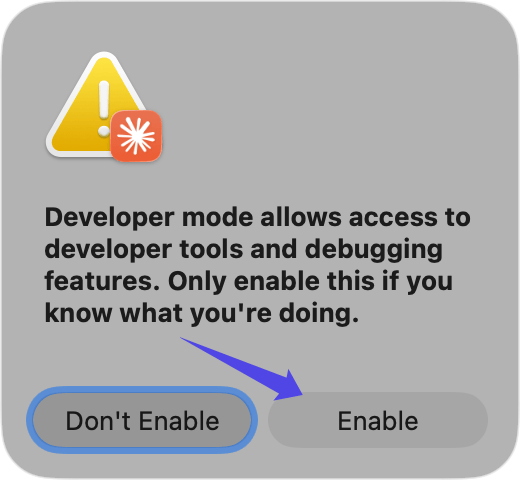
 確認ウィンドウで **Enable** をクリックし、Claude Desktop を再起動します。
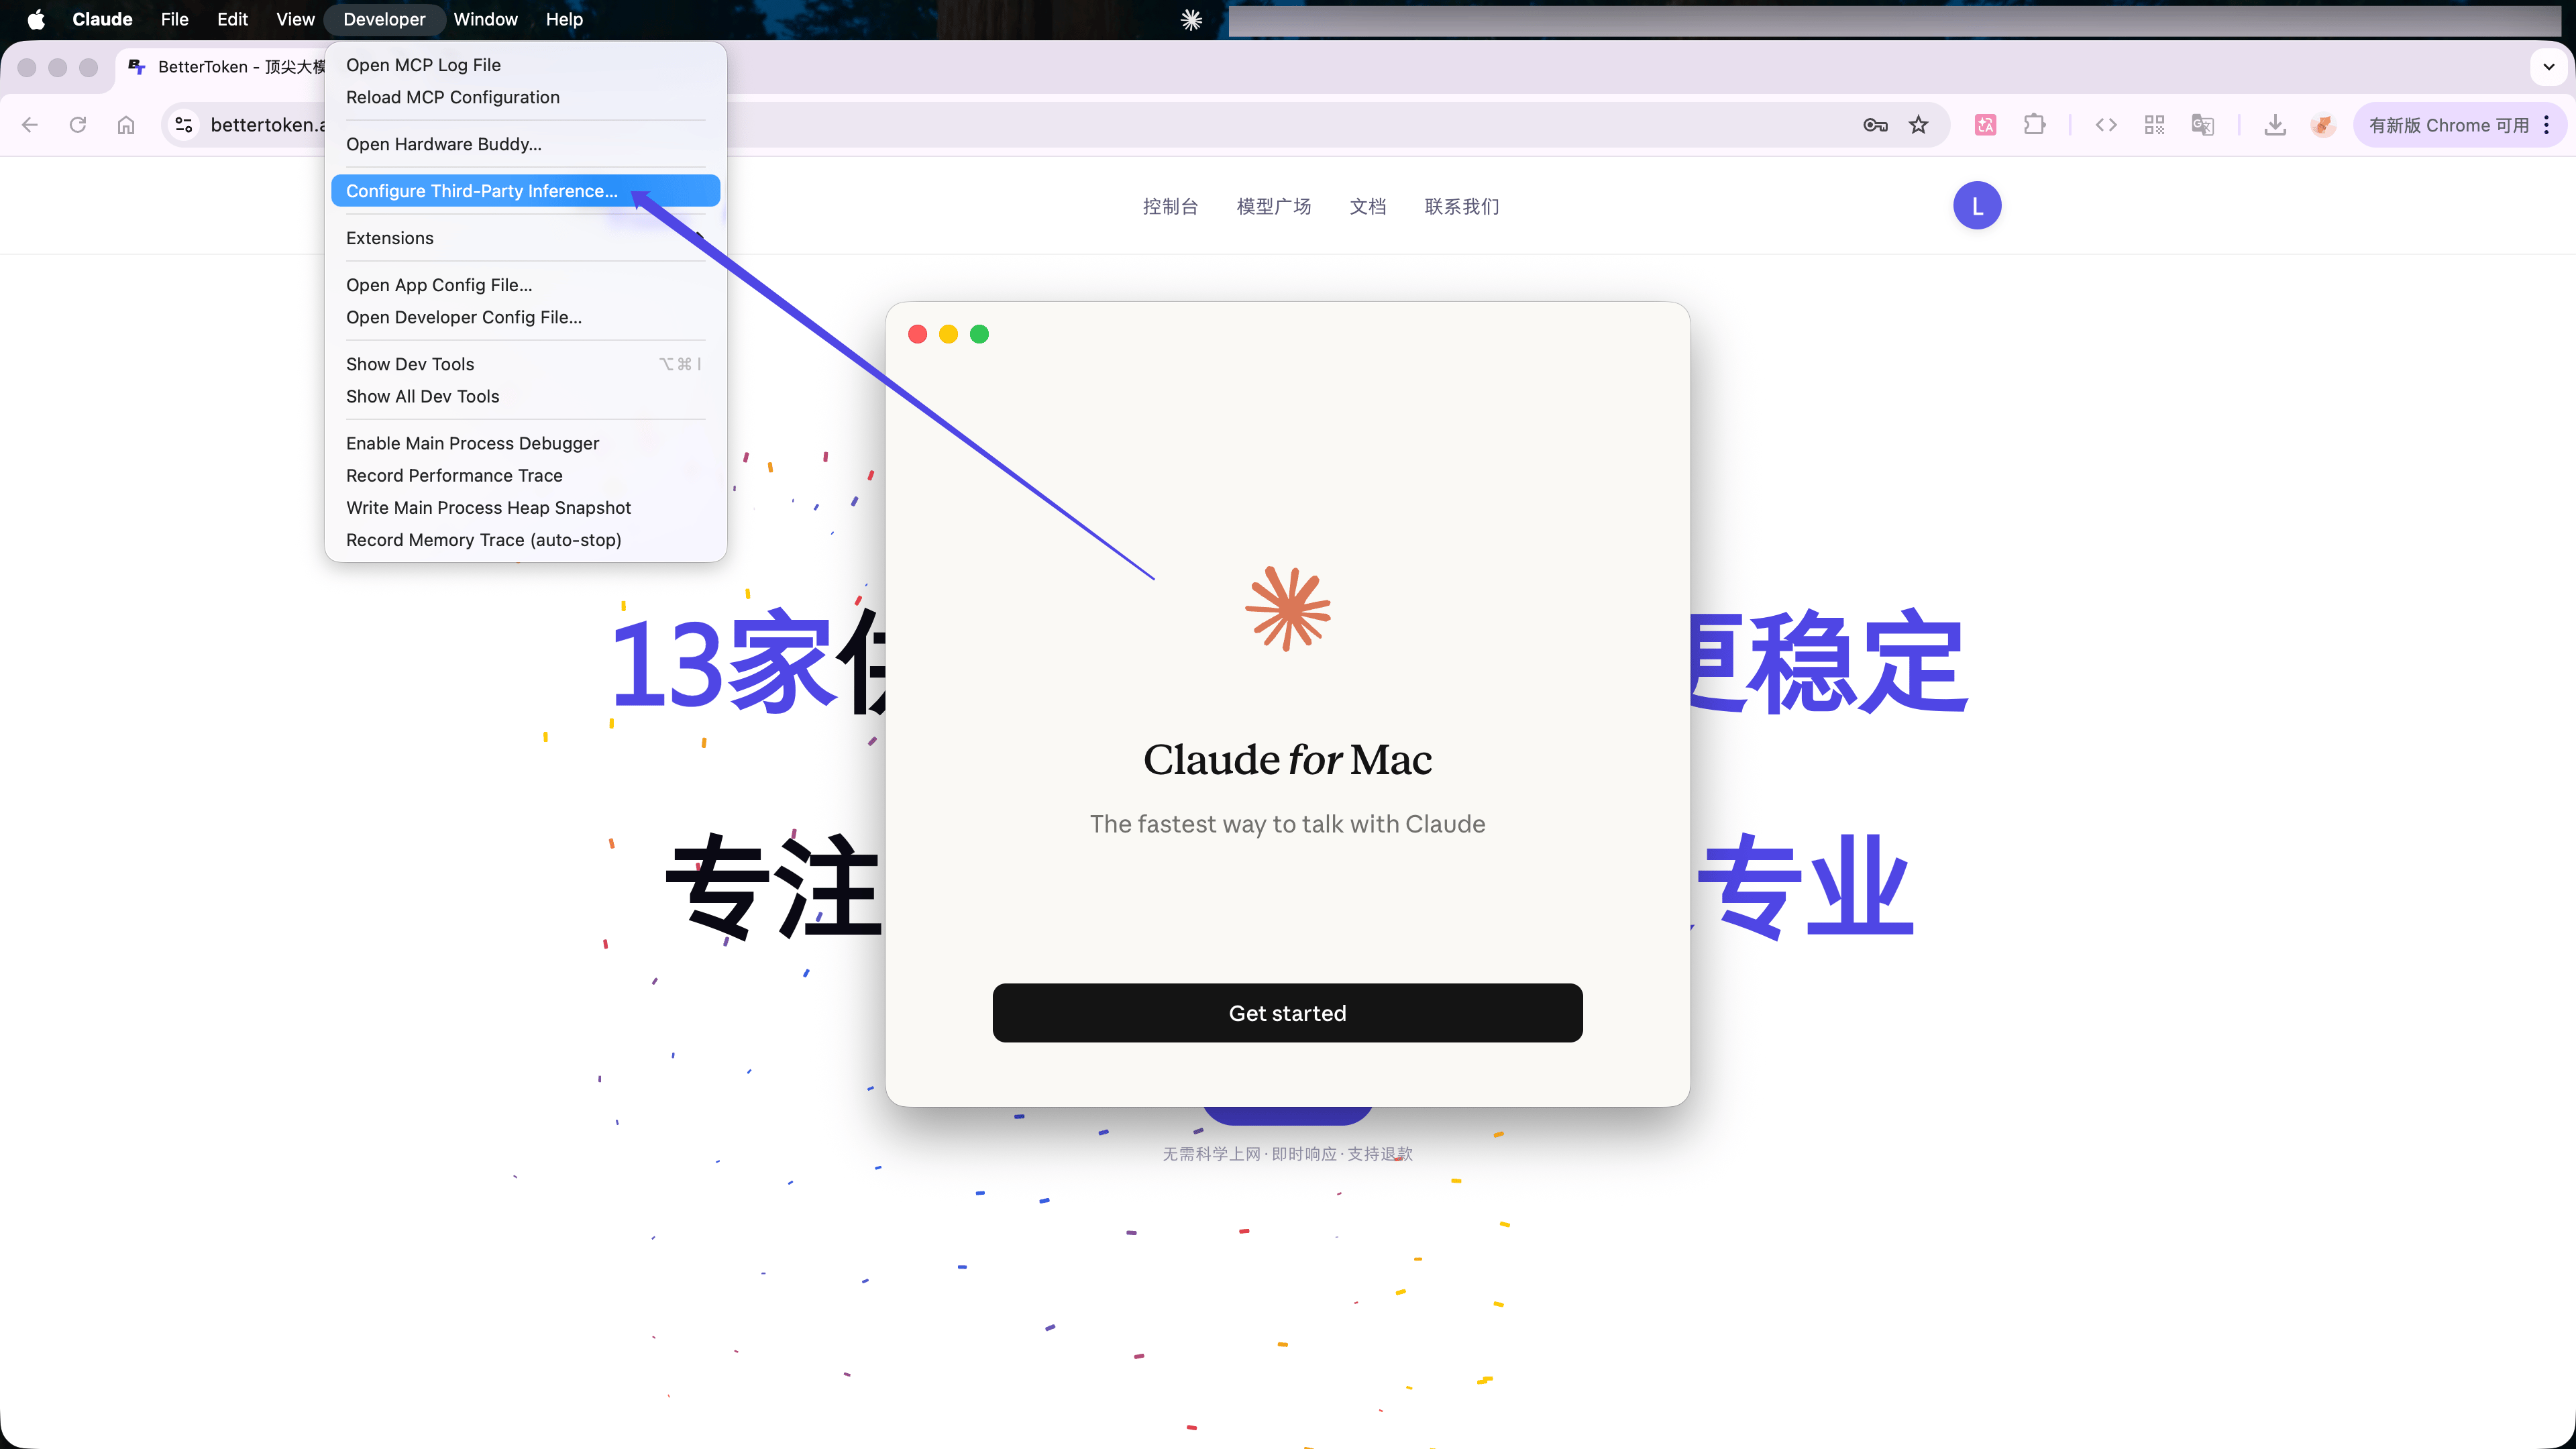
 再起動後、macOS メニューバーで **Developer** → **Configure Third-Party Inference...** を選択します。
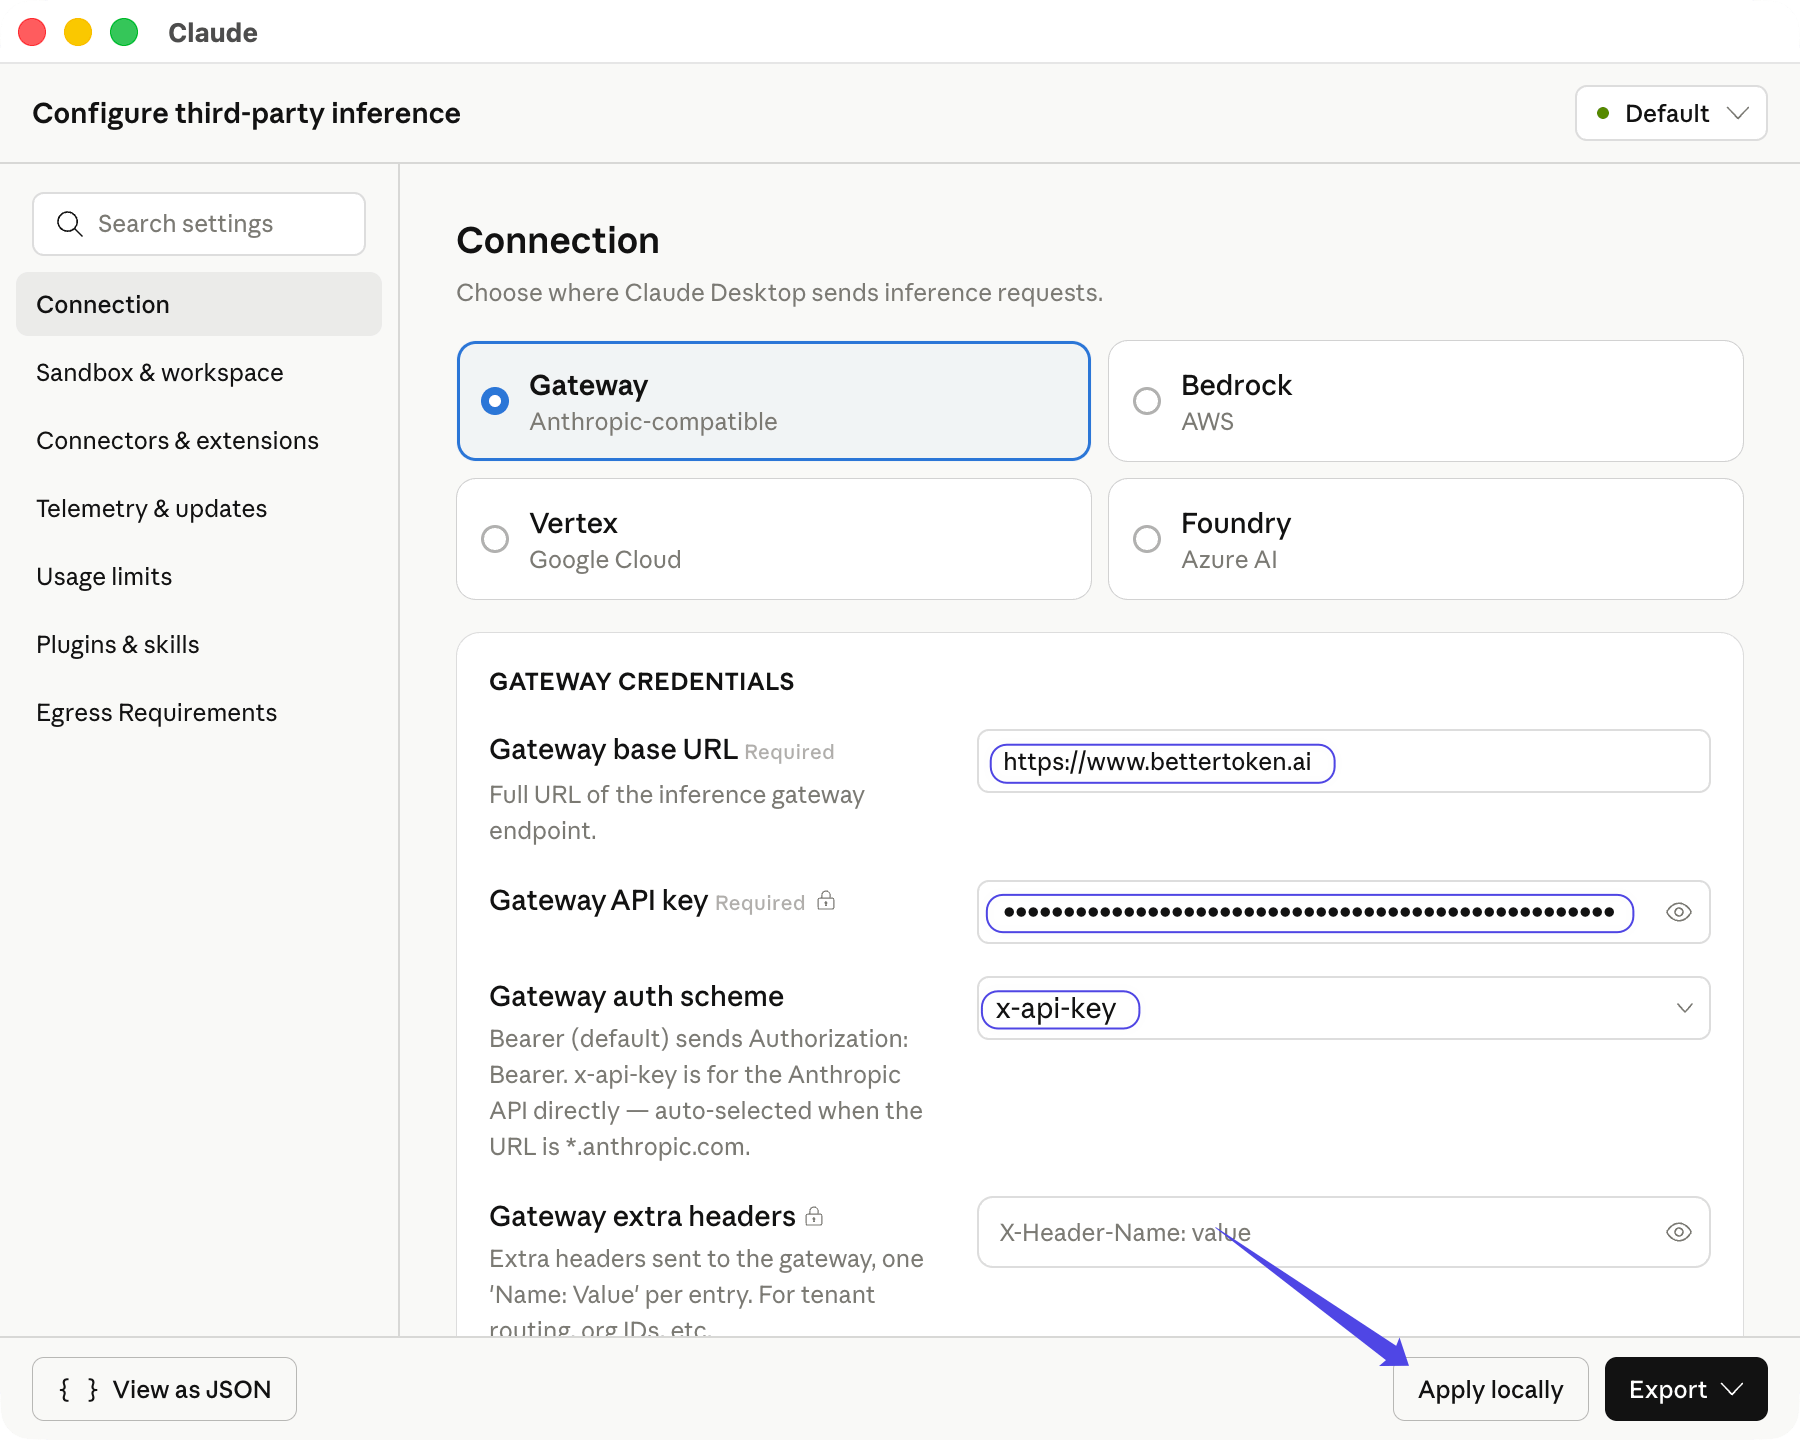
 **Gateway** を選択して、次を入力します。
| 項目 | 値 |
| ----------------------- | ---------------------------- |
| **Gateway base URL** | `https://www.bettertoken.ai` |
| **Gateway API key** | あなたの BetterToken API Key |
| **Gateway auth scheme** | `x-api-key` |
認証方式を選択すると、Claude Desktop が利用可能な Claude モデルを取得します。**Apply locally** をクリックしてください。
**Gateway** を選択して、次を入力します。
| 項目 | 値 |
| ----------------------- | ---------------------------- |
| **Gateway base URL** | `https://www.bettertoken.ai` |
| **Gateway API key** | あなたの BetterToken API Key |
| **Gateway auth scheme** | `x-api-key` |
認証方式を選択すると、Claude Desktop が利用可能な Claude モデルを取得します。**Apply locally** をクリックしてください。
 ## 接続を確認する
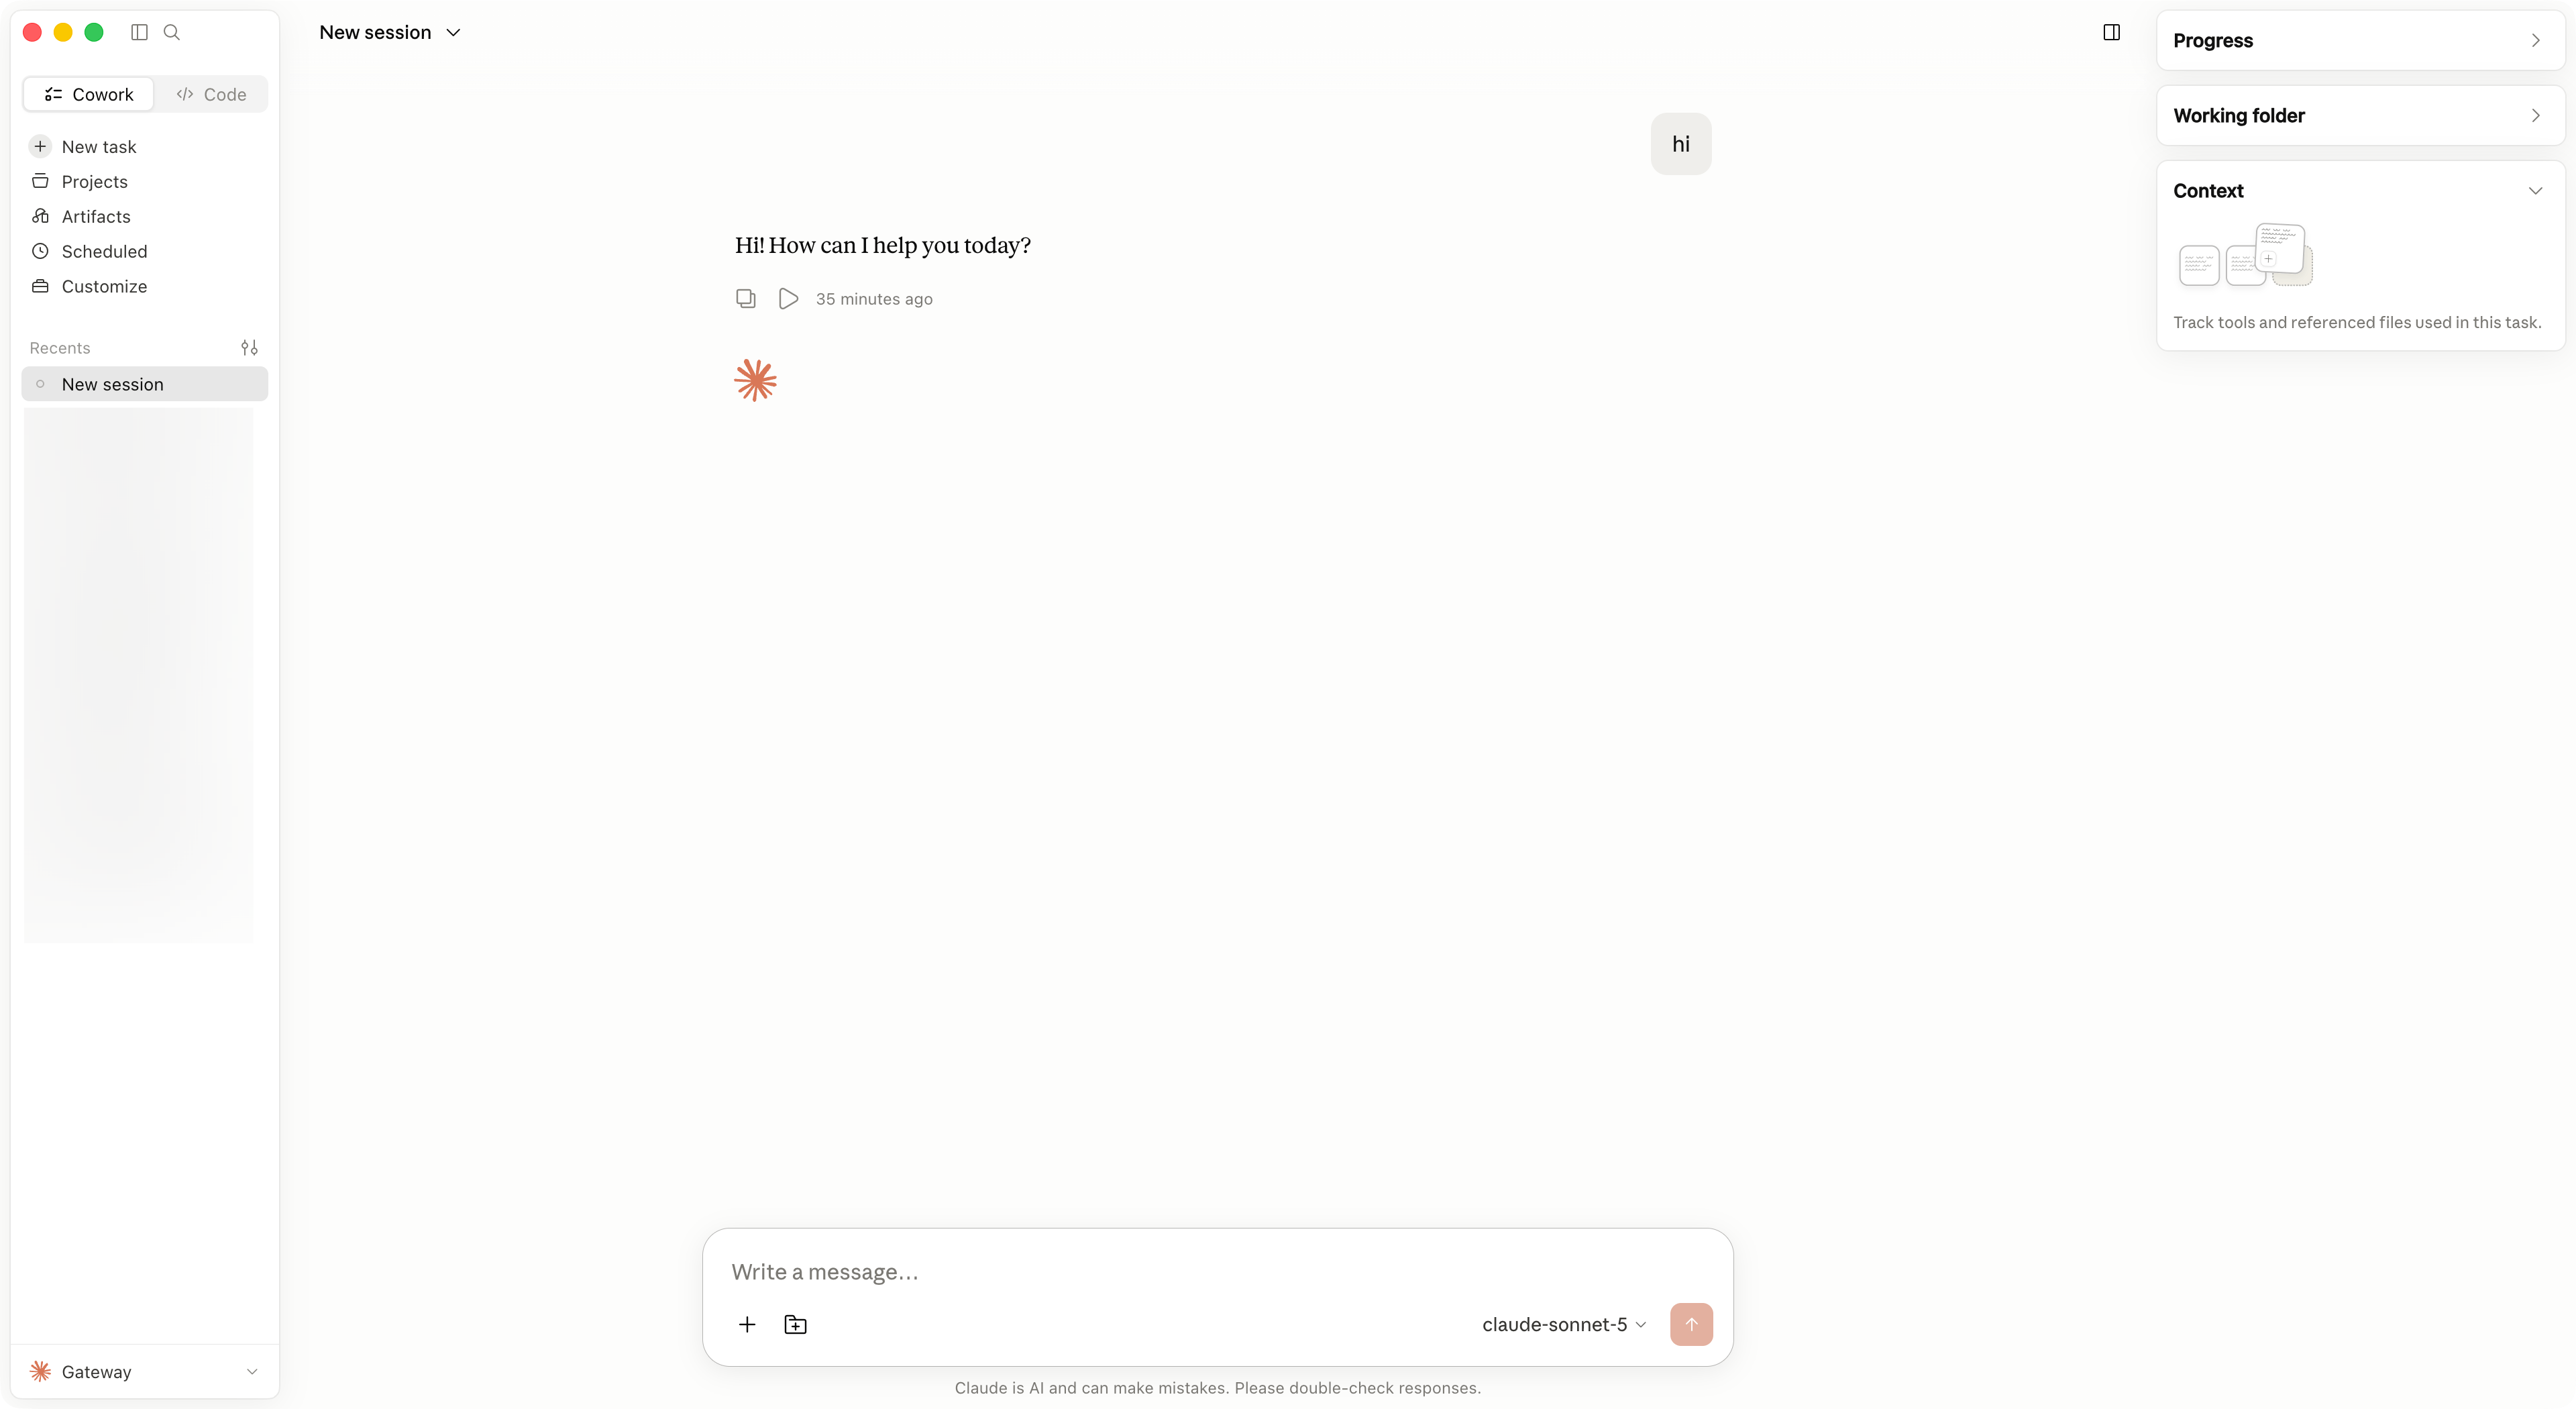
**Save & Restart** をクリックします。**Continue with Gateway** を選択して短いメッセージを送信してください。左下に **Gateway** が表示され、通常どおりメッセージが返れば設定は有効です。
## 接続を確認する
**Save & Restart** をクリックします。**Continue with Gateway** を選択して短いメッセージを送信してください。左下に **Gateway** が表示され、通常どおりメッセージが返れば設定は有効です。
 ## モデルを切り替える
モデルセレクターを開き、Gateway が返した別の Claude モデルを選択します。モデルが表示されない場合は、**Configure Third-Party Inference...** を開き直し、**Apply locally** をクリックして Claude Desktop を再起動します。
## よくあるエラー
| 問題 | 対処方法 |
| ----------------- | ----------------------------------------------------------------------------- |
| Gateway に接続できない | **Gateway base URL** には正確に `https://www.bettertoken.ai` を使用します。`/v1` は追加しません。 |
| リクエストが `401` を返す | BetterToken API Key をもう一度コピーし、認証方式が `x-api-key` であることを確認します。 |
| Claude モデルが表示されない | API Key で Claude プロバイダーのモデルを利用できることを確認し、設定ウィンドウを開き直します。 |
| 設定が適用されない | Claude Desktop を完全に終了して開き直し、**Continue with Gateway** を選択します。 |
## 高度な設定
Claude Desktop で GPT、Kimi、GLM、または他の Claude 以外のプロバイダーを使うには、[CC Switch の Claude Desktop タブ](/ja/ai-tools/cc-switch#claude-desktop)を参照してください。CC Switch が API Format、モデルマッピング、プロキシ、再起動の手順を処理します。
### 対応プロバイダー
| プロバイダー | 対応状況 |
| ------ | ----- |
| Claude | 手動設定 |
| GPT | 高度な設定 |
| Kimi | 高度な設定 |
| GLM | 高度な設定 |
ここに示す対応状況は、このページで説明する BetterToken の設定方法に適用されます。
* **高度な設定**:CC Switch をインストールし、ローカルプロキシ、プロトコル変換、またはモデルマッピングを使用します。
* **手動設定**:API Key、Base URL、Model を入力します。
### 関連ガイド
* [Claude Desktop で外部モデルを使う](/ja/faq/claude-desktop/third-party-models)
* [CC Switch で BetterToken を設定する](/ja/ai-tools/cc-switch)
* [Codex CLI でカスタムプロバイダーを設定する](/ja/ai-tools/codex)
* [最新の CC Switch リリースをダウンロードする](https://github.com/farion1231/cc-switch/releases)
## 技術詳細
Anthropic 互換の `https://www.bettertoken.ai` を `/v1` なしで **Gateway base URL** として使用します。認証方式には `x-api-key` を選択します。
## モデルを切り替える
モデルセレクターを開き、Gateway が返した別の Claude モデルを選択します。モデルが表示されない場合は、**Configure Third-Party Inference...** を開き直し、**Apply locally** をクリックして Claude Desktop を再起動します。
## よくあるエラー
| 問題 | 対処方法 |
| ----------------- | ----------------------------------------------------------------------------- |
| Gateway に接続できない | **Gateway base URL** には正確に `https://www.bettertoken.ai` を使用します。`/v1` は追加しません。 |
| リクエストが `401` を返す | BetterToken API Key をもう一度コピーし、認証方式が `x-api-key` であることを確認します。 |
| Claude モデルが表示されない | API Key で Claude プロバイダーのモデルを利用できることを確認し、設定ウィンドウを開き直します。 |
| 設定が適用されない | Claude Desktop を完全に終了して開き直し、**Continue with Gateway** を選択します。 |
## 高度な設定
Claude Desktop で GPT、Kimi、GLM、または他の Claude 以外のプロバイダーを使うには、[CC Switch の Claude Desktop タブ](/ja/ai-tools/cc-switch#claude-desktop)を参照してください。CC Switch が API Format、モデルマッピング、プロキシ、再起動の手順を処理します。
### 対応プロバイダー
| プロバイダー | 対応状況 |
| ------ | ----- |
| Claude | 手動設定 |
| GPT | 高度な設定 |
| Kimi | 高度な設定 |
| GLM | 高度な設定 |
ここに示す対応状況は、このページで説明する BetterToken の設定方法に適用されます。
* **高度な設定**:CC Switch をインストールし、ローカルプロキシ、プロトコル変換、またはモデルマッピングを使用します。
* **手動設定**:API Key、Base URL、Model を入力します。
### 関連ガイド
* [Claude Desktop で外部モデルを使う](/ja/faq/claude-desktop/third-party-models)
* [CC Switch で BetterToken を設定する](/ja/ai-tools/cc-switch)
* [Codex CLI でカスタムプロバイダーを設定する](/ja/ai-tools/codex)
* [最新の CC Switch リリースをダウンロードする](https://github.com/farion1231/cc-switch/releases)
## 技術詳細
Anthropic 互換の `https://www.bettertoken.ai` を `/v1` なしで **Gateway base URL** として使用します。認証方式には `x-api-key` を選択します。