> ## Documentation Index
> Fetch the complete documentation index at: https://docs.bettertoken.ai/llms.txt
> Use this file to discover all available pages before exploring further.
# BetterToken के साथ Claude मॉडल को Claude Desktop से जोड़ें
> Base URL और API Key के साथ Claude Desktop Gateway में BetterToken Claude provider कॉन्फ़िगर करें।
यह पेज केवल BetterToken **Claude provider** के लिए सीधा Claude Desktop setup बताता है। BetterToken API Key, `https://www.bettertoken.ai` और `x-api-key` भरें, फिर Claude Desktop रीस्टार्ट करें।
## मुख्य सेटिंग्स
| फ़ील्ड | मान |
| -------- | ---------------------------- |
| API Key | BetterToken API Key |
| Base URL | `https://www.bettertoken.ai` |
| मॉडल | Claude provider मॉडल |
## आवश्यक शर्तें
* BetterToken API Key बनाएं और कॉपी करें
* पुष्टि करें कि API Key Claude provider मॉडल उपयोग कर सकती है
## इंस्टॉल करें
[Claude Desktop website](https://claude.ai/download) से नवीनतम संस्करण इंस्टॉल या अपडेट करें, फिर Claude Desktop शुरू करें।
## मैन्युअल सेटअप
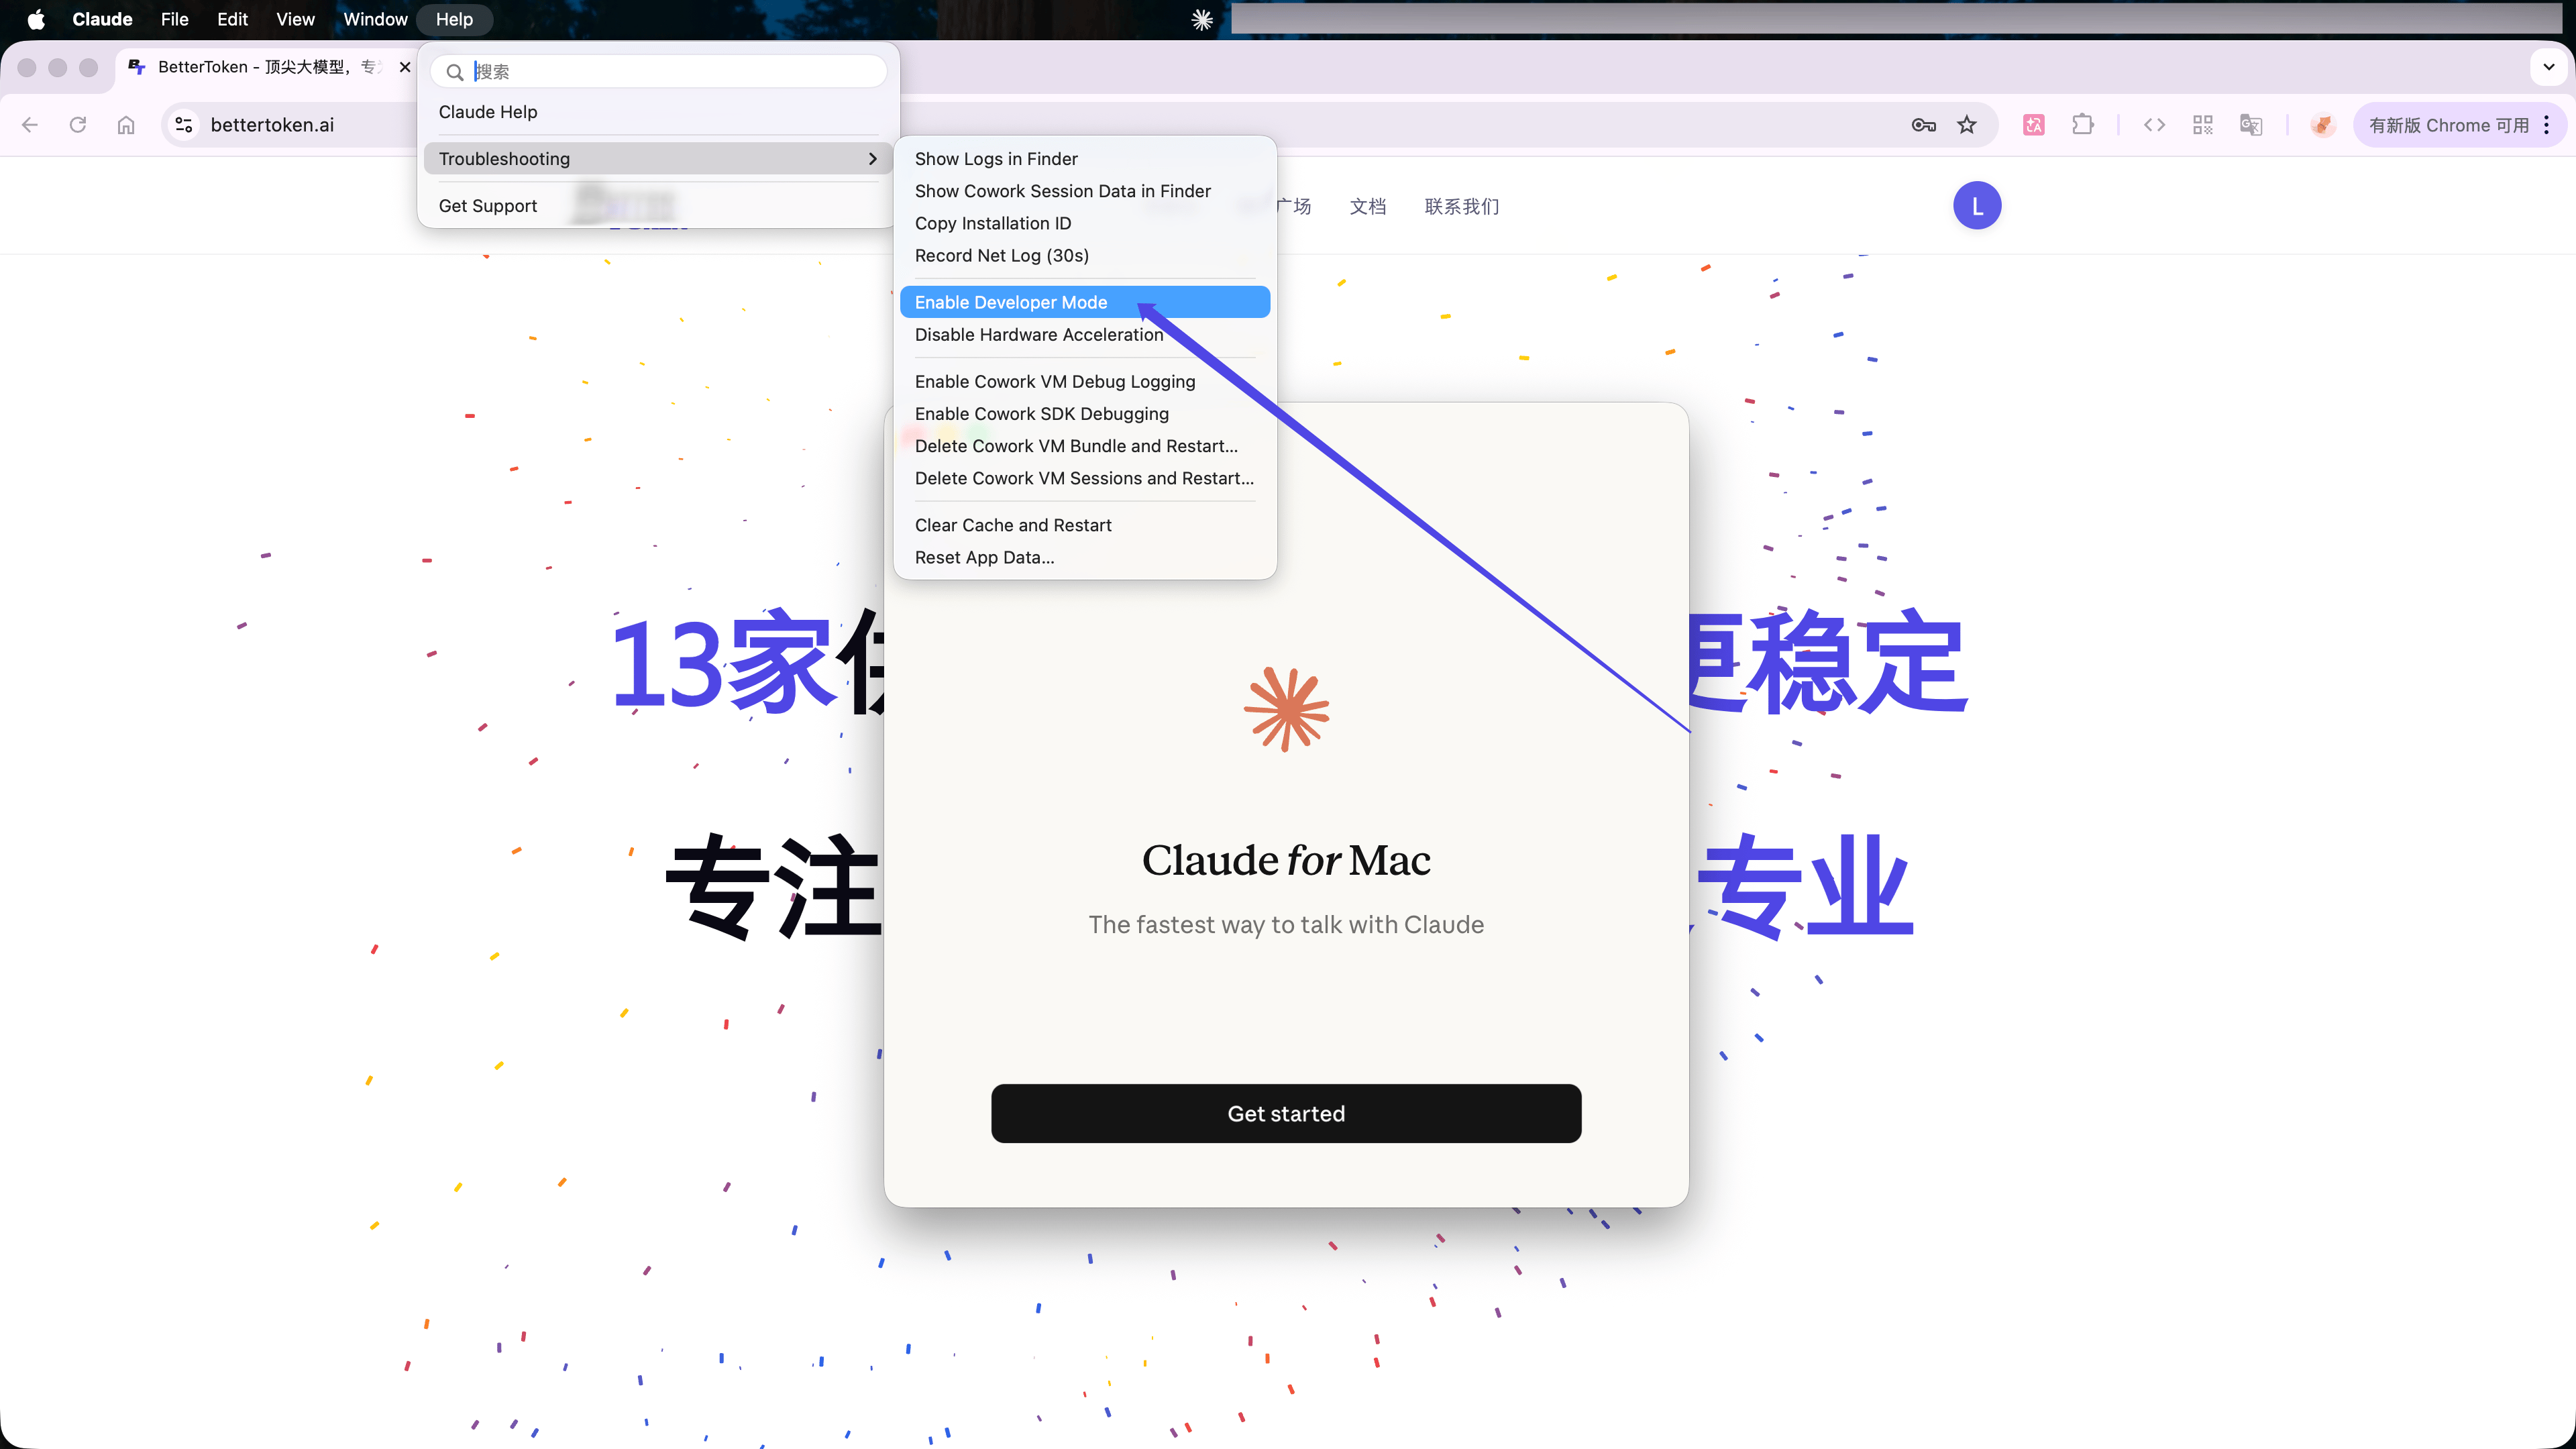
Claude Desktop में macOS menu bar से **Help** → **Troubleshooting** → **Enable Developer Mode** चुनें।
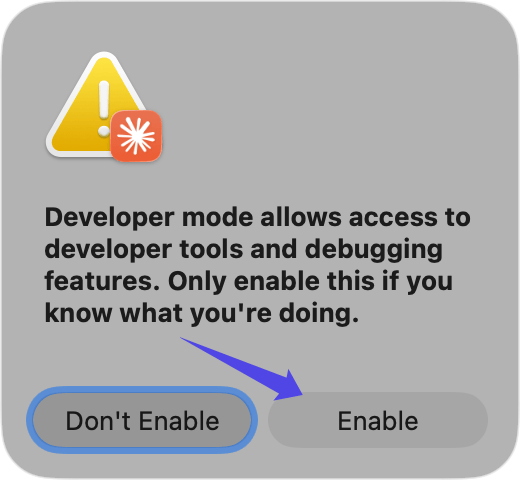
 confirmation window में **Enable** क्लिक करें, फिर Claude Desktop रीस्टार्ट करें।
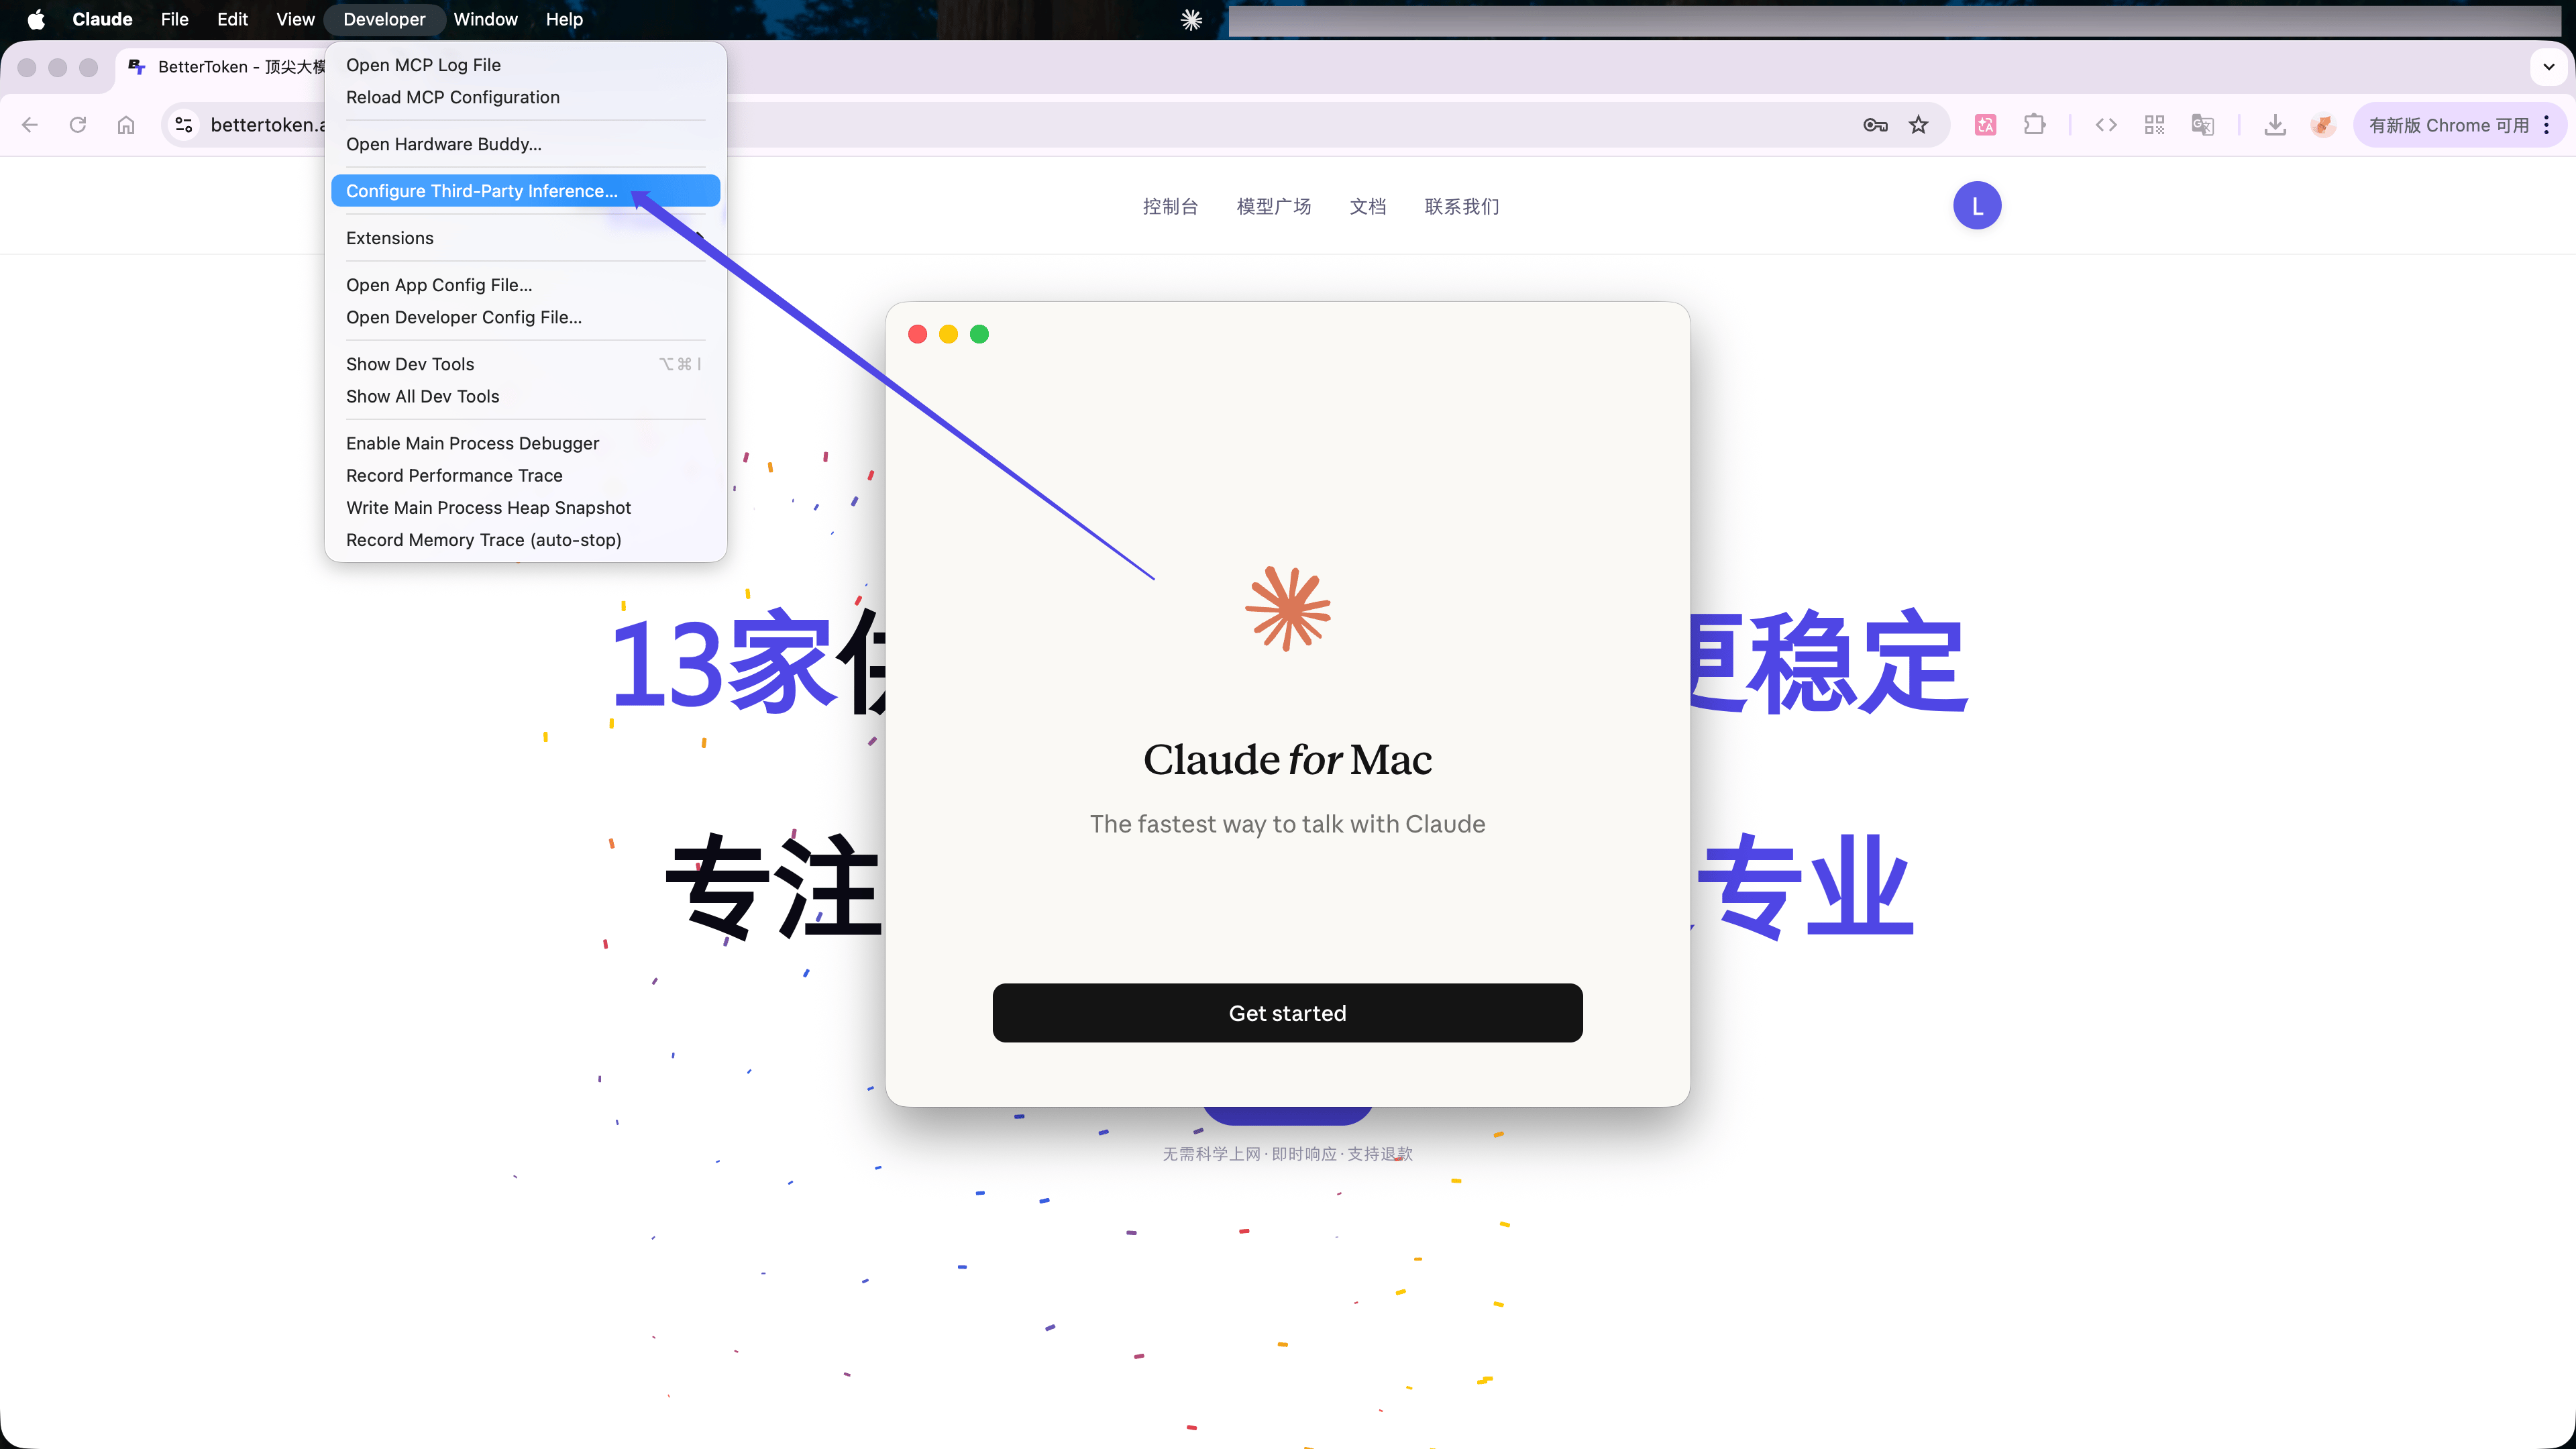
 रीस्टार्ट के बाद macOS menu bar से **Developer** → **Configure Third-Party Inference...** चुनें।
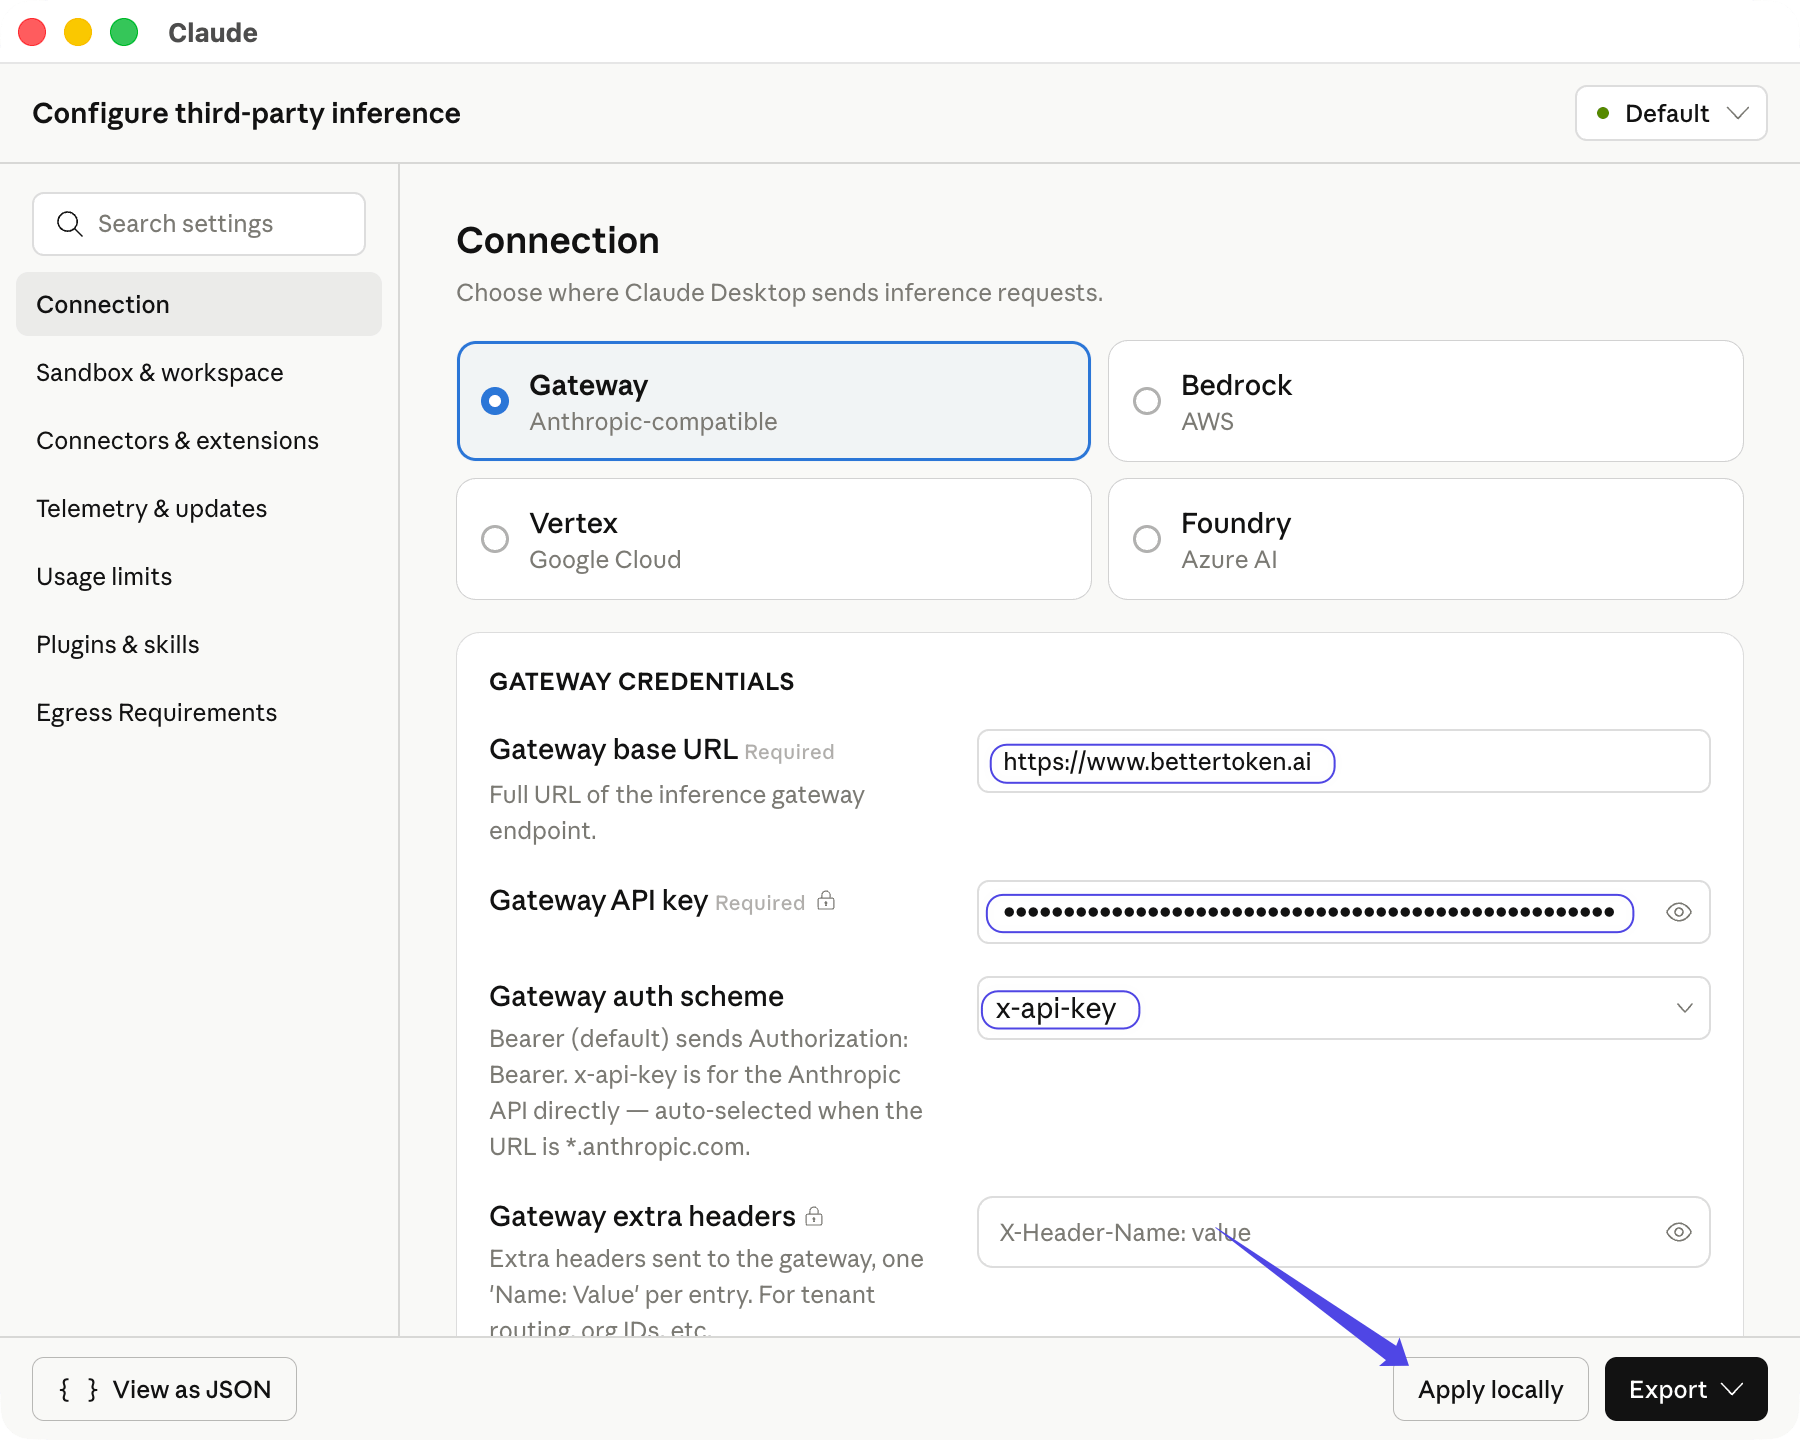
 **Gateway** चुनें, फिर भरें:
| फ़ील्ड | मान |
| ----------------------- | ---------------------------- |
| **Gateway base URL** | `https://www.bettertoken.ai` |
| **Gateway API key** | आपकी BetterToken API Key |
| **Gateway auth scheme** | `x-api-key` |
auth scheme चुनने के बाद Claude Desktop उपलब्ध Claude मॉडल लेता है। **Apply locally** क्लिक करें।
**Gateway** चुनें, फिर भरें:
| फ़ील्ड | मान |
| ----------------------- | ---------------------------- |
| **Gateway base URL** | `https://www.bettertoken.ai` |
| **Gateway API key** | आपकी BetterToken API Key |
| **Gateway auth scheme** | `x-api-key` |
auth scheme चुनने के बाद Claude Desktop उपलब्ध Claude मॉडल लेता है। **Apply locally** क्लिक करें।
 ## कनेक्शन सत्यापित करें
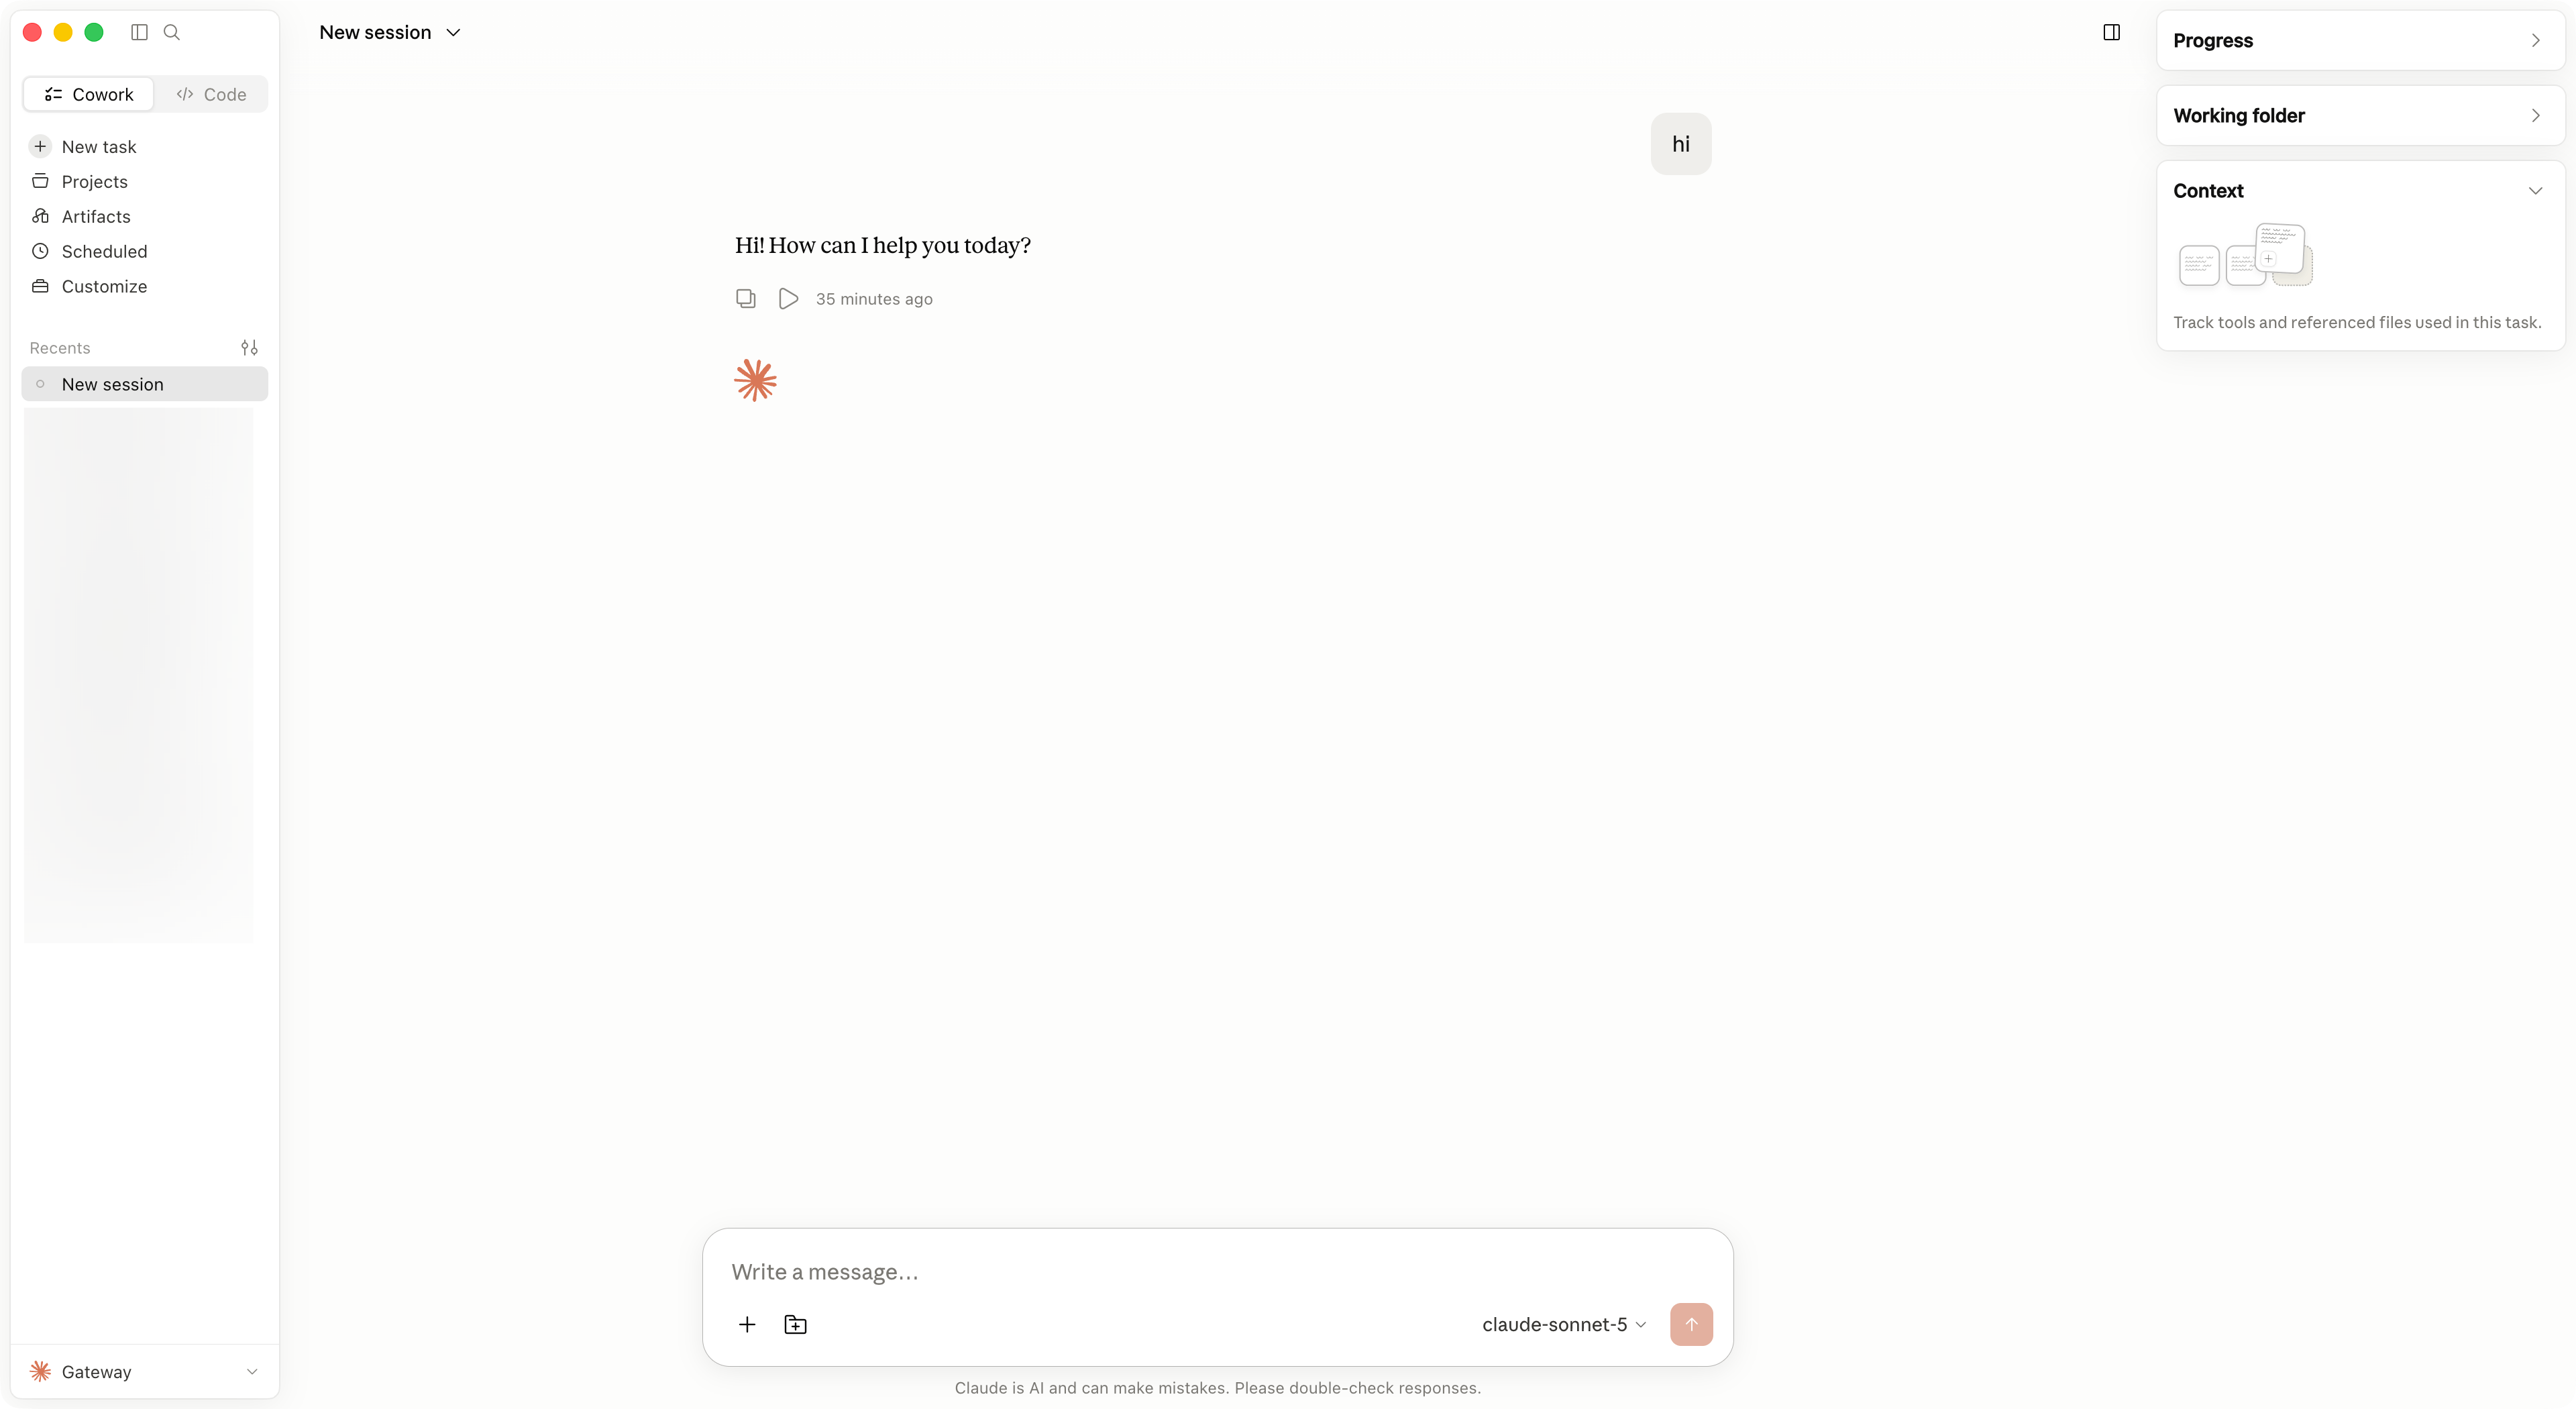
**Save & Restart** क्लिक करें। **Continue with Gateway** चुनें, फिर छोटा संदेश भेजें। नीचे-बाएं कोने में **Gateway** दिखे और संदेश सामान्य उत्तर दे तो setup सक्रिय है।
## कनेक्शन सत्यापित करें
**Save & Restart** क्लिक करें। **Continue with Gateway** चुनें, फिर छोटा संदेश भेजें। नीचे-बाएं कोने में **Gateway** दिखे और संदेश सामान्य उत्तर दे तो setup सक्रिय है।
 ## मॉडल बदलें
मॉडल selector खोलें और Gateway द्वारा लौटाया दूसरा Claude मॉडल चुनें। मॉडल न मिले तो **Configure Third-Party Inference...** फिर खोलें, **Apply locally** क्लिक करें और Claude Desktop रीस्टार्ट करें।
## सामान्य त्रुटियां
| समस्या | समाधान |
| ---------------------------- | ----------------------------------------------------------------------------------------------- |
| Gateway कनेक्ट नहीं होता | **Gateway base URL** के लिए ठीक `https://www.bettertoken.ai` उपयोग करें। `/v1` न जोड़ें। |
| अनुरोध `401` लौटाता है | BetterToken API Key फिर कॉपी करें और पुष्टि करें कि auth scheme `x-api-key` है। |
| कोई Claude मॉडल नहीं दिखता | पुष्टि करें कि API Key Claude provider मॉडल उपयोग कर सकती है, फिर settings window दोबारा खोलें। |
| configuration लागू नहीं होता | Claude Desktop पूरी तरह बंद करें, फिर खोलें और **Continue with Gateway** चुनें। |
## उन्नत सेटअप
Claude Desktop में GPT, Kimi, GLM या अन्य non-Claude provider उपयोग करने के लिए [CC Switch का Claude Desktop टैब](/hi/ai-tools/cc-switch#claude-desktop) अपनाएं। CC Switch API Format, मॉडल mapping, proxy और restart flow संभालता है।
### समर्थित provider
| Provider | स्थिति |
| -------- | -------------- |
| Claude | मैन्युअल सेटअप |
| GPT | उन्नत सेटअप |
| Kimi | उन्नत सेटअप |
| GLM | उन्नत सेटअप |
ये स्थितियां केवल इस पेज पर बताए गए BetterToken सेटअप पर लागू होती हैं।
* **उन्नत सेटअप**: CC Switch इंस्टॉल करें और local proxy, protocol conversion या model mapping का उपयोग करें।
* **मैन्युअल सेटअप**: API Key, Base URL और Model दर्ज करें।
### संबंधित गाइड
* [Claude Desktop में third-party मॉडल उपयोग करें](/hi/faq/claude-desktop/third-party-models)
* [CC Switch में BetterToken कॉन्फ़िगर करें](/hi/ai-tools/cc-switch)
* [Codex CLI में कस्टम provider कॉन्फ़िगर करें](/hi/ai-tools/codex)
* [नवीनतम CC Switch release डाउनलोड करें](https://github.com/farion1231/cc-switch/releases)
## तकनीकी विवरण
Anthropic-compatible `https://www.bettertoken.ai` को `/v1` के बिना **Gateway base URL** के रूप में उपयोग करें। authentication scheme में `x-api-key` चुनें।
## मॉडल बदलें
मॉडल selector खोलें और Gateway द्वारा लौटाया दूसरा Claude मॉडल चुनें। मॉडल न मिले तो **Configure Third-Party Inference...** फिर खोलें, **Apply locally** क्लिक करें और Claude Desktop रीस्टार्ट करें।
## सामान्य त्रुटियां
| समस्या | समाधान |
| ---------------------------- | ----------------------------------------------------------------------------------------------- |
| Gateway कनेक्ट नहीं होता | **Gateway base URL** के लिए ठीक `https://www.bettertoken.ai` उपयोग करें। `/v1` न जोड़ें। |
| अनुरोध `401` लौटाता है | BetterToken API Key फिर कॉपी करें और पुष्टि करें कि auth scheme `x-api-key` है। |
| कोई Claude मॉडल नहीं दिखता | पुष्टि करें कि API Key Claude provider मॉडल उपयोग कर सकती है, फिर settings window दोबारा खोलें। |
| configuration लागू नहीं होता | Claude Desktop पूरी तरह बंद करें, फिर खोलें और **Continue with Gateway** चुनें। |
## उन्नत सेटअप
Claude Desktop में GPT, Kimi, GLM या अन्य non-Claude provider उपयोग करने के लिए [CC Switch का Claude Desktop टैब](/hi/ai-tools/cc-switch#claude-desktop) अपनाएं। CC Switch API Format, मॉडल mapping, proxy और restart flow संभालता है।
### समर्थित provider
| Provider | स्थिति |
| -------- | -------------- |
| Claude | मैन्युअल सेटअप |
| GPT | उन्नत सेटअप |
| Kimi | उन्नत सेटअप |
| GLM | उन्नत सेटअप |
ये स्थितियां केवल इस पेज पर बताए गए BetterToken सेटअप पर लागू होती हैं।
* **उन्नत सेटअप**: CC Switch इंस्टॉल करें और local proxy, protocol conversion या model mapping का उपयोग करें।
* **मैन्युअल सेटअप**: API Key, Base URL और Model दर्ज करें।
### संबंधित गाइड
* [Claude Desktop में third-party मॉडल उपयोग करें](/hi/faq/claude-desktop/third-party-models)
* [CC Switch में BetterToken कॉन्फ़िगर करें](/hi/ai-tools/cc-switch)
* [Codex CLI में कस्टम provider कॉन्फ़िगर करें](/hi/ai-tools/codex)
* [नवीनतम CC Switch release डाउनलोड करें](https://github.com/farion1231/cc-switch/releases)
## तकनीकी विवरण
Anthropic-compatible `https://www.bettertoken.ai` को `/v1` के बिना **Gateway base URL** के रूप में उपयोग करें। authentication scheme में `x-api-key` चुनें।