> ## Documentation Index
> Fetch the complete documentation index at: https://docs.bettertoken.ai/llms.txt
> Use this file to discover all available pages before exploring further.
# Quickstart
> In 4 steps, claim credit, create a token, and continue with the right setup guide for your tool.
Visit the BetterToken registration page (`https://www.bettertoken.ai/register`) to create an account.
You'll automatically receive a **¥5 trial credit** on signup.
After you sign in, open **Wallet management** in the left sidebar. If you have a redemption code, redeem it first before you create a token.
On the **Wallet management** page, find the **Redeem code** section. Paste your code, then click **Redeem credit**.
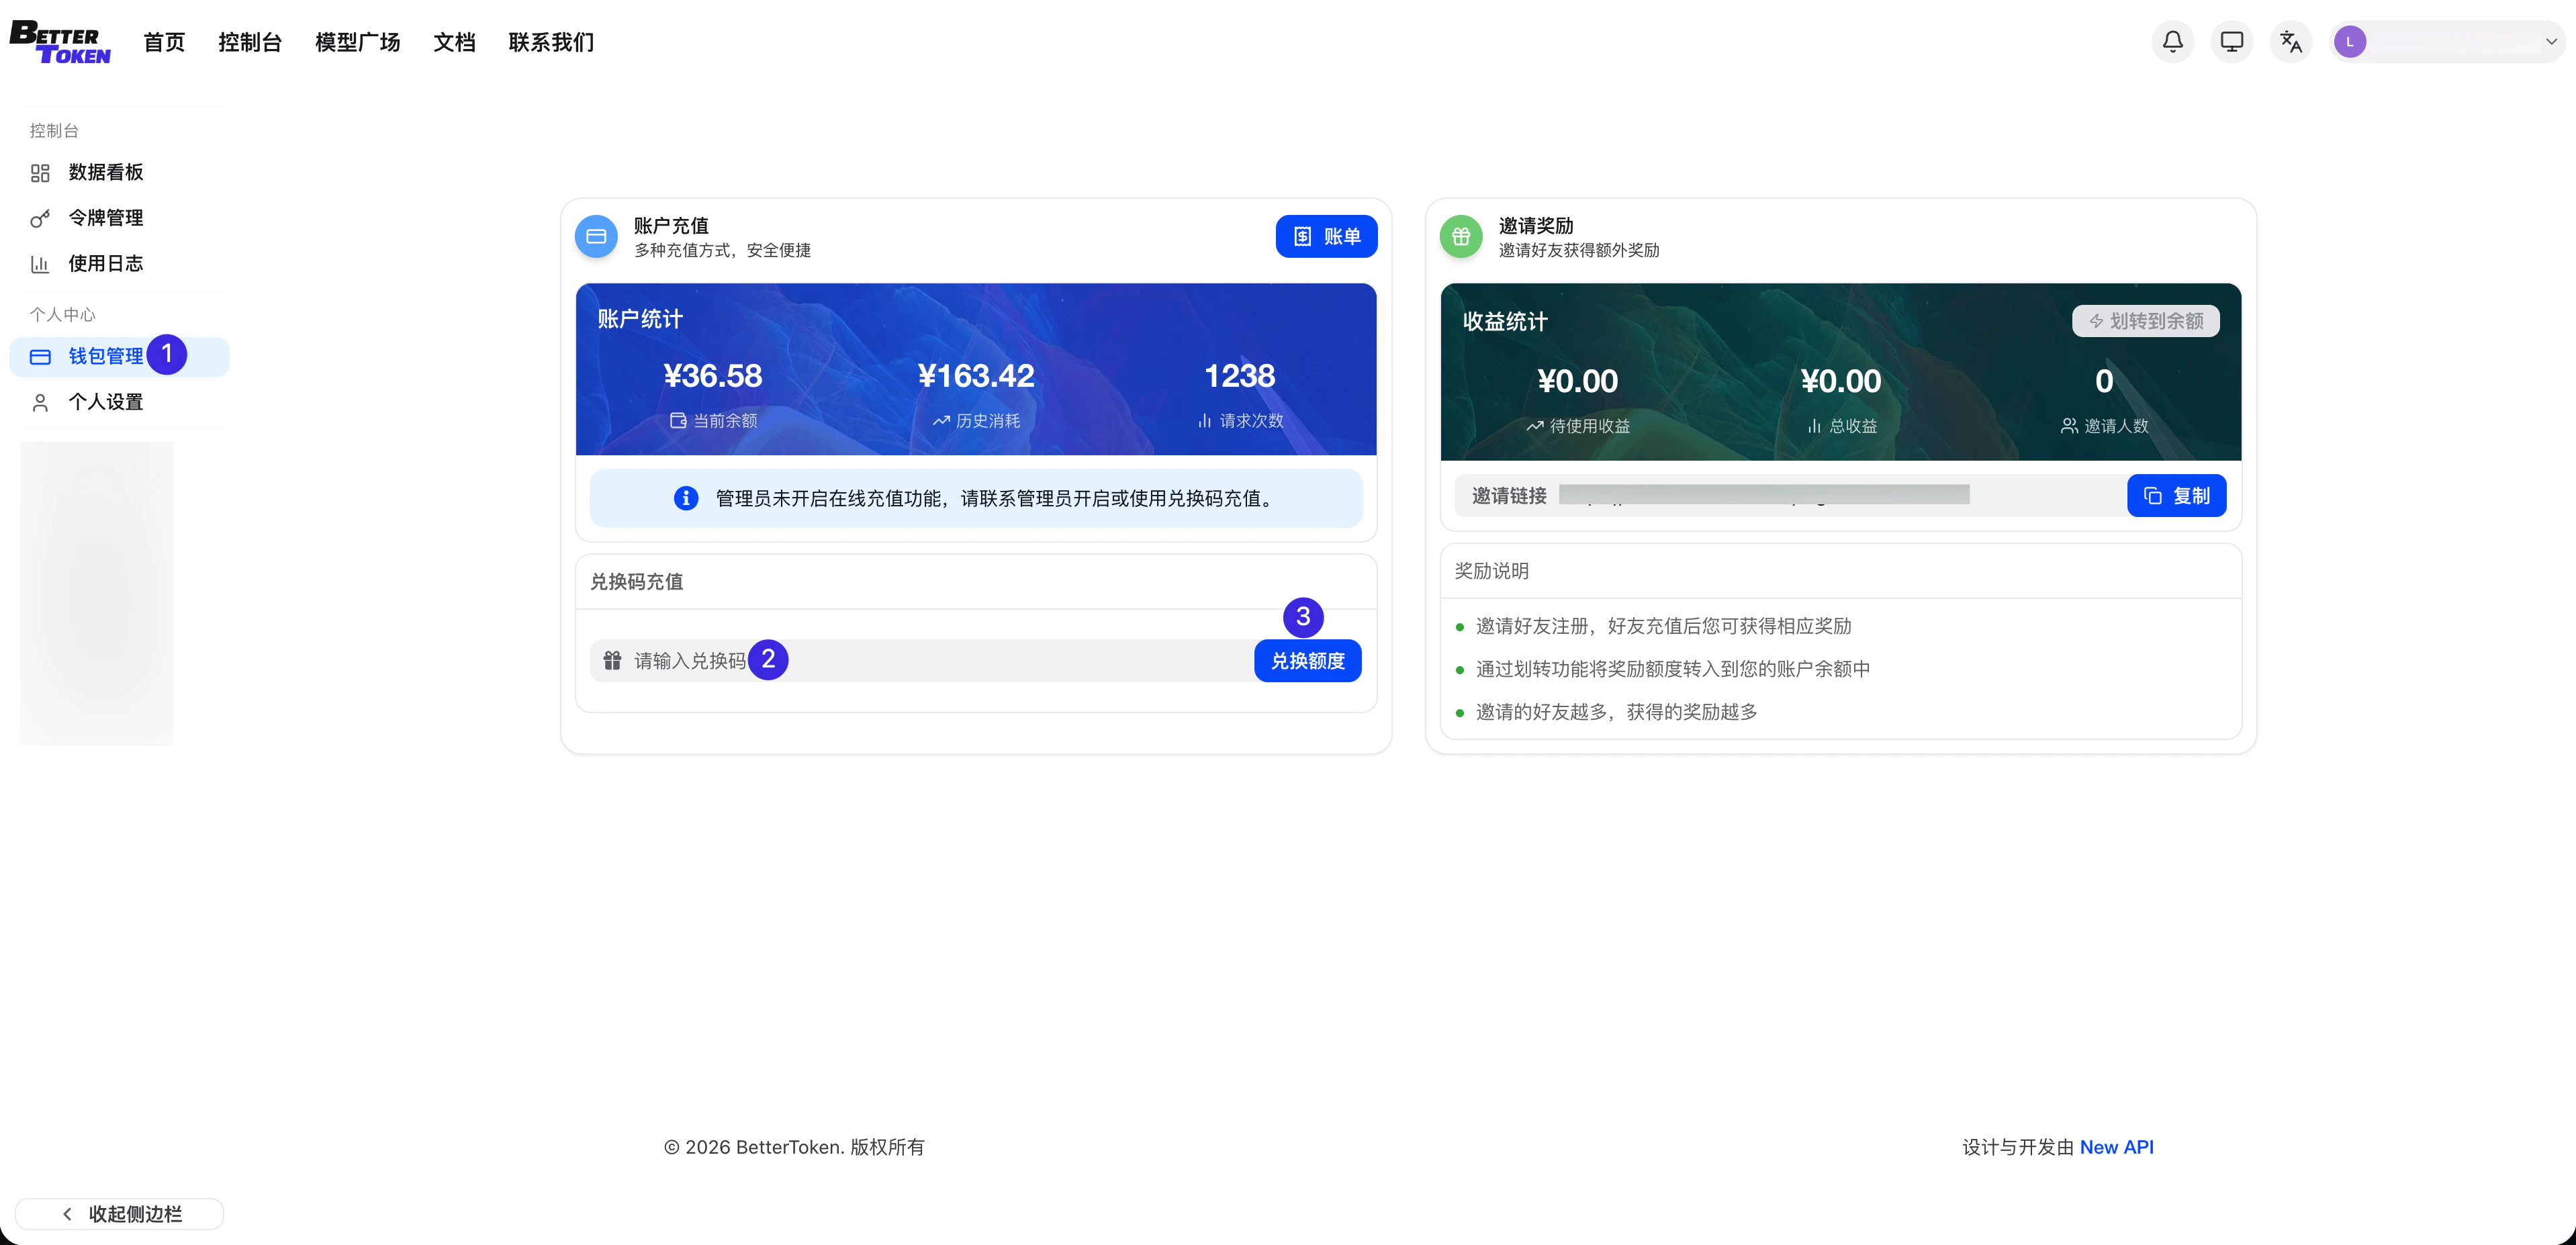 Follow the highlighted order in the screenshot:
1. Click **Wallet management** in the sidebar
2. Paste the code into the input field
3. Click **Redeem credit**
Online top-up is not open yet.
You may still see the **Top up** entry in the dashboard, but for now you should use the trial credit or a redemption code instead.
Once you have available credit, open **Token management** in the left sidebar. Then click **Add token**.
Follow the highlighted order in the screenshot:
1. Click **Wallet management** in the sidebar
2. Paste the code into the input field
3. Click **Redeem credit**
Online top-up is not open yet.
You may still see the **Top up** entry in the dashboard, but for now you should use the trial credit or a redemption code instead.
Once you have available credit, open **Token management** in the left sidebar. Then click **Add token**.
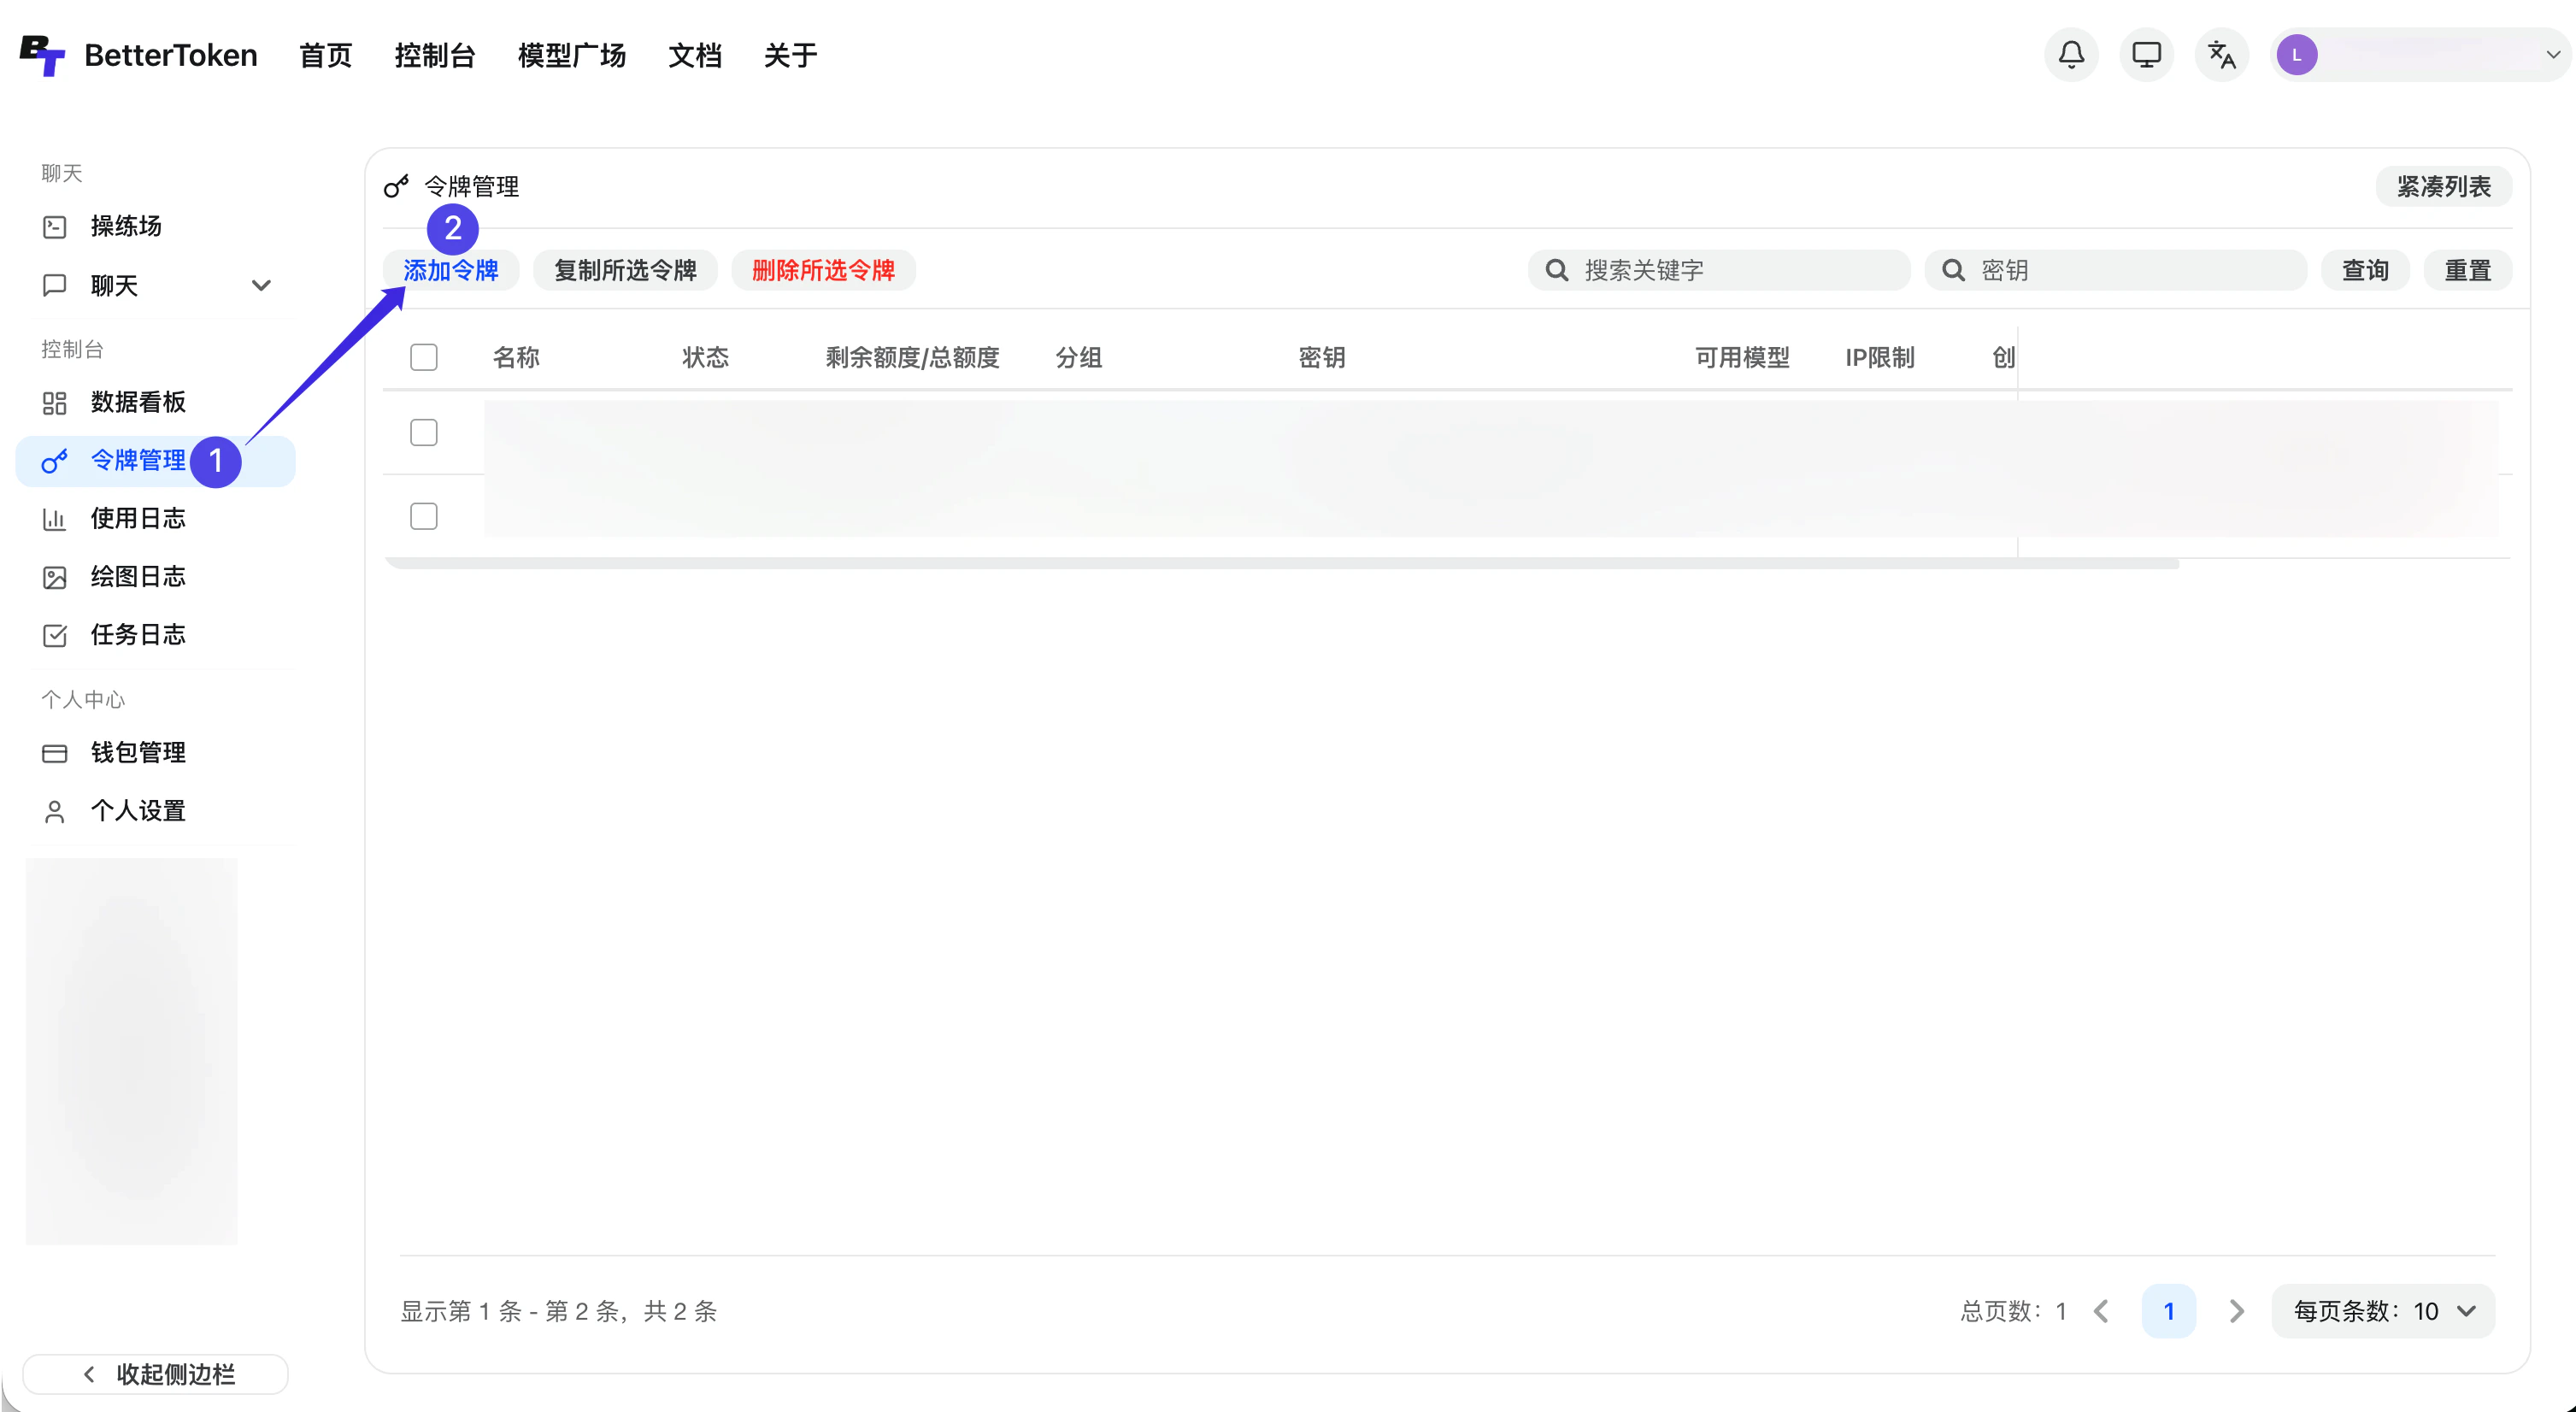 This opens a drawer where you name the group and create the token.
Think of the group name as the intended use of this token. If you pick the right group first, the rest of the setup is much easier.
In the drawer, name the group based on the tool you will connect.
Groups that start with `Claude` can only be used with Claude Code.
Groups that start with `Codex` can be used with Codex and external tools such as Cursor, Cline, Zed, and Roo Code.
Use a simple naming pattern:
```text theme={null}
Claude-your-name
Codex-your-name
```
For example: `Claude-main` or `Codex-team`.
After you create the token, copy the API Key.
Keep your API Key safe. Store it as an environment variable instead of hardcoding it into source code or config files.
Start with:
```bash theme={null}
export BETTERTOKEN_API_KEY="your-api-key-here"
```
At this point, you only need to remember one rule: choose the correct group first, then follow the matching tool guide.
If you are connecting Claude Code, use a group that starts with `Claude`, then continue with the [Claude Code guide](/en/ai-tools/claude-code).
If you are connecting Codex or any external tool, use a group that starts with `Codex`, then continue with the [Codex guide](/en/ai-tools/codex).
Different tools use different `Base URL` values, auth fields, and model-group settings. Follow the dedicated tool guide instead of copying one setup into every client.
## Next steps
Continue with the guide that matches your tool:
Start here if you want to manage Claude Code, Codex CLI, OpenCode, and OpenClaw providers in one place.
Use a group that starts with `Claude` and follow the full Claude Code setup guide.
Use a group that starts with `Codex` and follow the full Codex setup guide.
This opens a drawer where you name the group and create the token.
Think of the group name as the intended use of this token. If you pick the right group first, the rest of the setup is much easier.
In the drawer, name the group based on the tool you will connect.
Groups that start with `Claude` can only be used with Claude Code.
Groups that start with `Codex` can be used with Codex and external tools such as Cursor, Cline, Zed, and Roo Code.
Use a simple naming pattern:
```text theme={null}
Claude-your-name
Codex-your-name
```
For example: `Claude-main` or `Codex-team`.
After you create the token, copy the API Key.
Keep your API Key safe. Store it as an environment variable instead of hardcoding it into source code or config files.
Start with:
```bash theme={null}
export BETTERTOKEN_API_KEY="your-api-key-here"
```
At this point, you only need to remember one rule: choose the correct group first, then follow the matching tool guide.
If you are connecting Claude Code, use a group that starts with `Claude`, then continue with the [Claude Code guide](/en/ai-tools/claude-code).
If you are connecting Codex or any external tool, use a group that starts with `Codex`, then continue with the [Codex guide](/en/ai-tools/codex).
Different tools use different `Base URL` values, auth fields, and model-group settings. Follow the dedicated tool guide instead of copying one setup into every client.
## Next steps
Continue with the guide that matches your tool:
Start here if you want to manage Claude Code, Codex CLI, OpenCode, and OpenClaw providers in one place.
Use a group that starts with `Claude` and follow the full Claude Code setup guide.
Use a group that starts with `Codex` and follow the full Codex setup guide.